
Integrate ArcherySec + OWASP ZAP in Jenkins CI/CD Pipeline
Continuous Integration / Continuous Deployment (CI/CD) processes allow software developers to detect problems early in the development lifecycle and improve productivity with automation.
“Jenkins is a popular open-source continuous integration solution that helps teams manage the automation of software build, as well as monitor the execution of external jobs that supports the software build.”
When you run security testing in your CI/CD pipeline, you want to store vulnerability data in centralize way and manage them easily for your every single pipeline. DevOps teams are facing challenges to have a central place where they can visualize vulnerabilities transparently. Vulnerability Management is one of the challenging part for every organization.
In this article we’ll be going learn how to integrate Archery tool in your jenkins CI/CD pipeline.
"ArcherySec is an open source vulnerability assessment and management tool that helps developer and pentester to perform vulnerability assessment and manage vulnerabilities."
Archery has API that interact with Archery tool and automate vulnerability assessment process.
Archerysec-cli uses the API to interact Archery tool from console. We often use archerysec-cli in our CI/CD pipeline steps to perform scan and feed vulnerability data into Archery tool.
Configure Lab Environment:
Requirements:
- Docker & docker-compose
Steps to configure Lab Environment.
$ git clone https://github.com/archerysec/jenkins_blog.git
$ cd jenkins_blog
$ docker-compose up --build
We have written small scripts and Infrastructure as a code that allow you to spin up environment on your system.
docker-compose.yml
version: '3.6'

services:
  jenkins:
    build: ./jenkins
    ports:
      - "8080:8080"
      - "50000:50000"
    volumes:
      - /var/run/docker.sock:/var/run/docker.sock
      # - /usr/bin/docker:/usr/bin/docker
      - /usr/local/bin/docker:/usr/local/bin/docker
      - /tmp:/tmp
    expose:
      - "8080"
      - "50000"
    container_name: jenkins

  db:
    image: postgres:10.1-alpine
    volumes:
      - ./dbdata:/var/lib/postgresql/data
    environment:
      - POSTGRES_DB=archerysec
      - POSTGRES_PASSWORD=archerysec
      - POSTGRES_USER=archerysec

  archerysec:
    image: archerysec/archerysec
    ports:
      - "8000:8000"
    expose:
      - "8000"
    depends_on:
      - db
    links:
      - db:db
    environment:
      - DB_PASSWORD=archerysec
      - DB_USER=archerysec
      - NAME=user
      - EMAIL=admin@user.com
      - PASSWORD=admin@123A
      - DB_NAME=archerysec
      - DB_HOST=db
      - DJANGO_SETTINGS_MODULE=archerysecurity.settings.development
      - DJANGO_SECRET_KEY=${DJANGO_SECRET_KEY:-"SETME"}
      - DJANGO_DEBUG=1
      - EMAIL_HOST=mailhog
      - EMAIL_PORT=1025
    container_name: archerysec
Once containers are up and running you could check whether they are accessible or not by accessing the below URL’s.
ArcherySec: http://your_system_ip_address:8000
Jenkins: http://your_system_ip_address:8080
OWASP ZAP: http://your_system_ip_address:8090
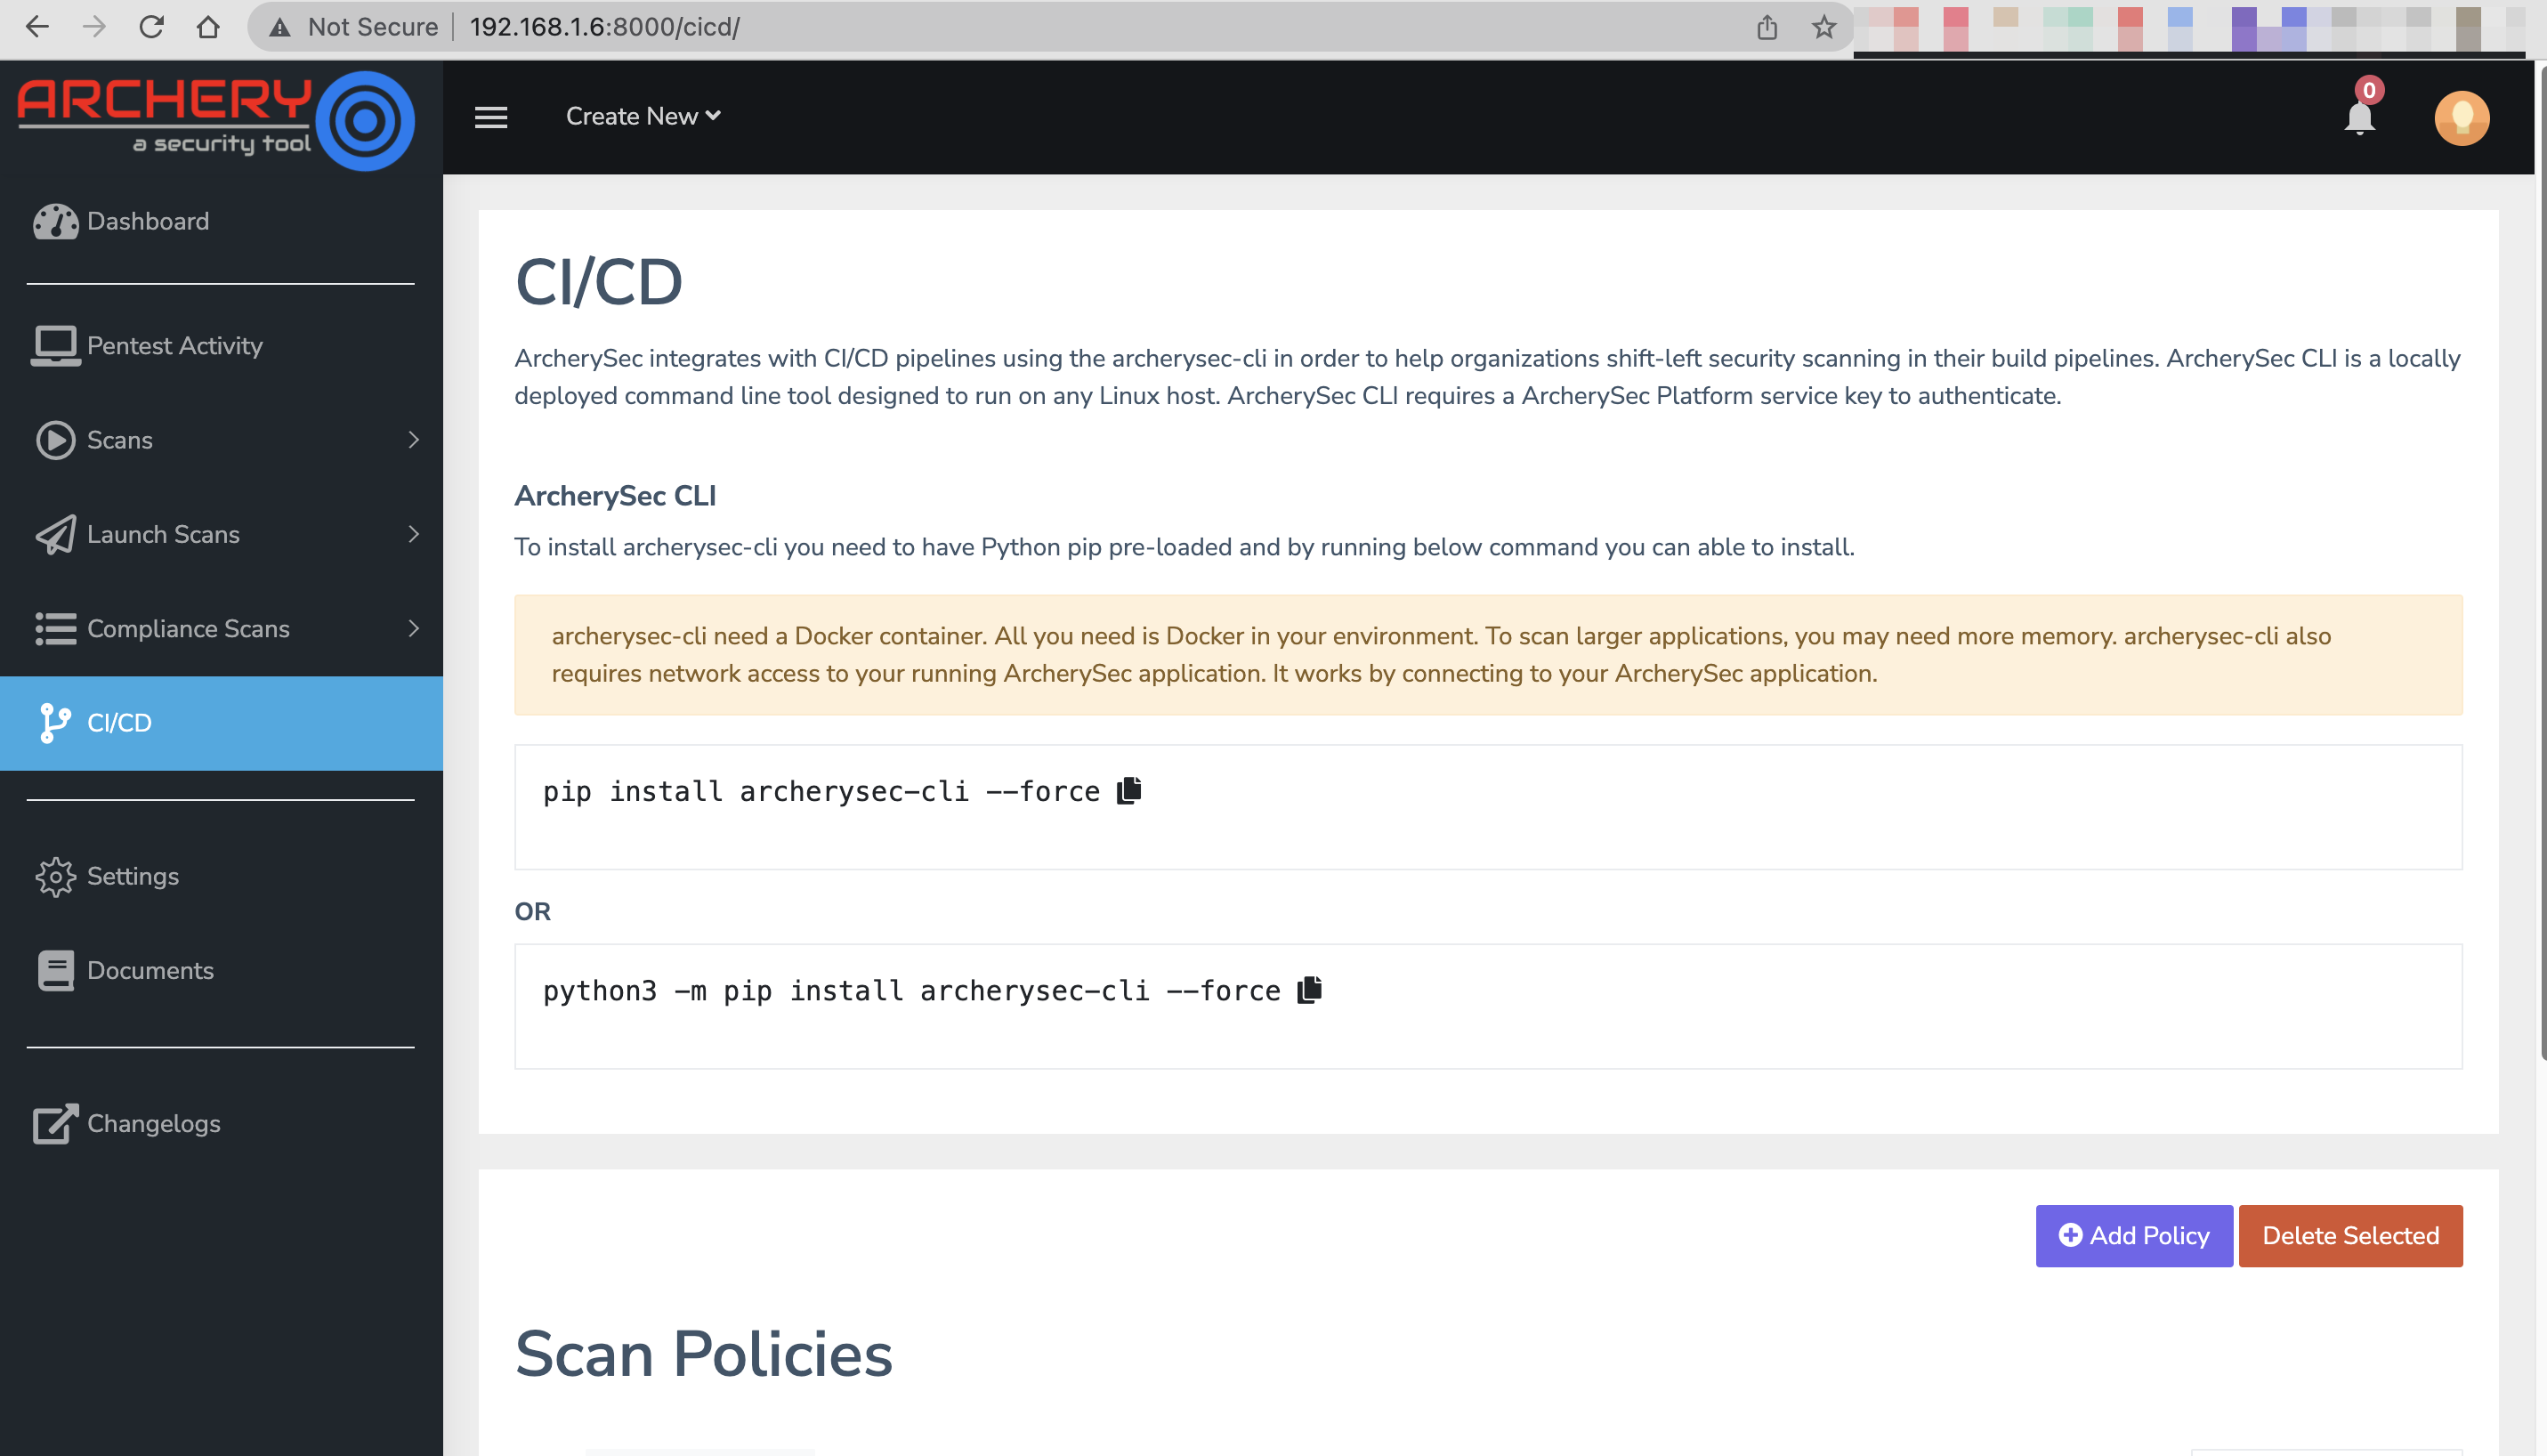
Setup CI/CD Policy for ZAP Scanner
- Open ArcherySec portal.
- Go to settings page http://your_system_ip_address:8000
- Username:
admin@user.com
- Password:
admin@123A
- Click on
Add Project
- Go to
CI/CD module
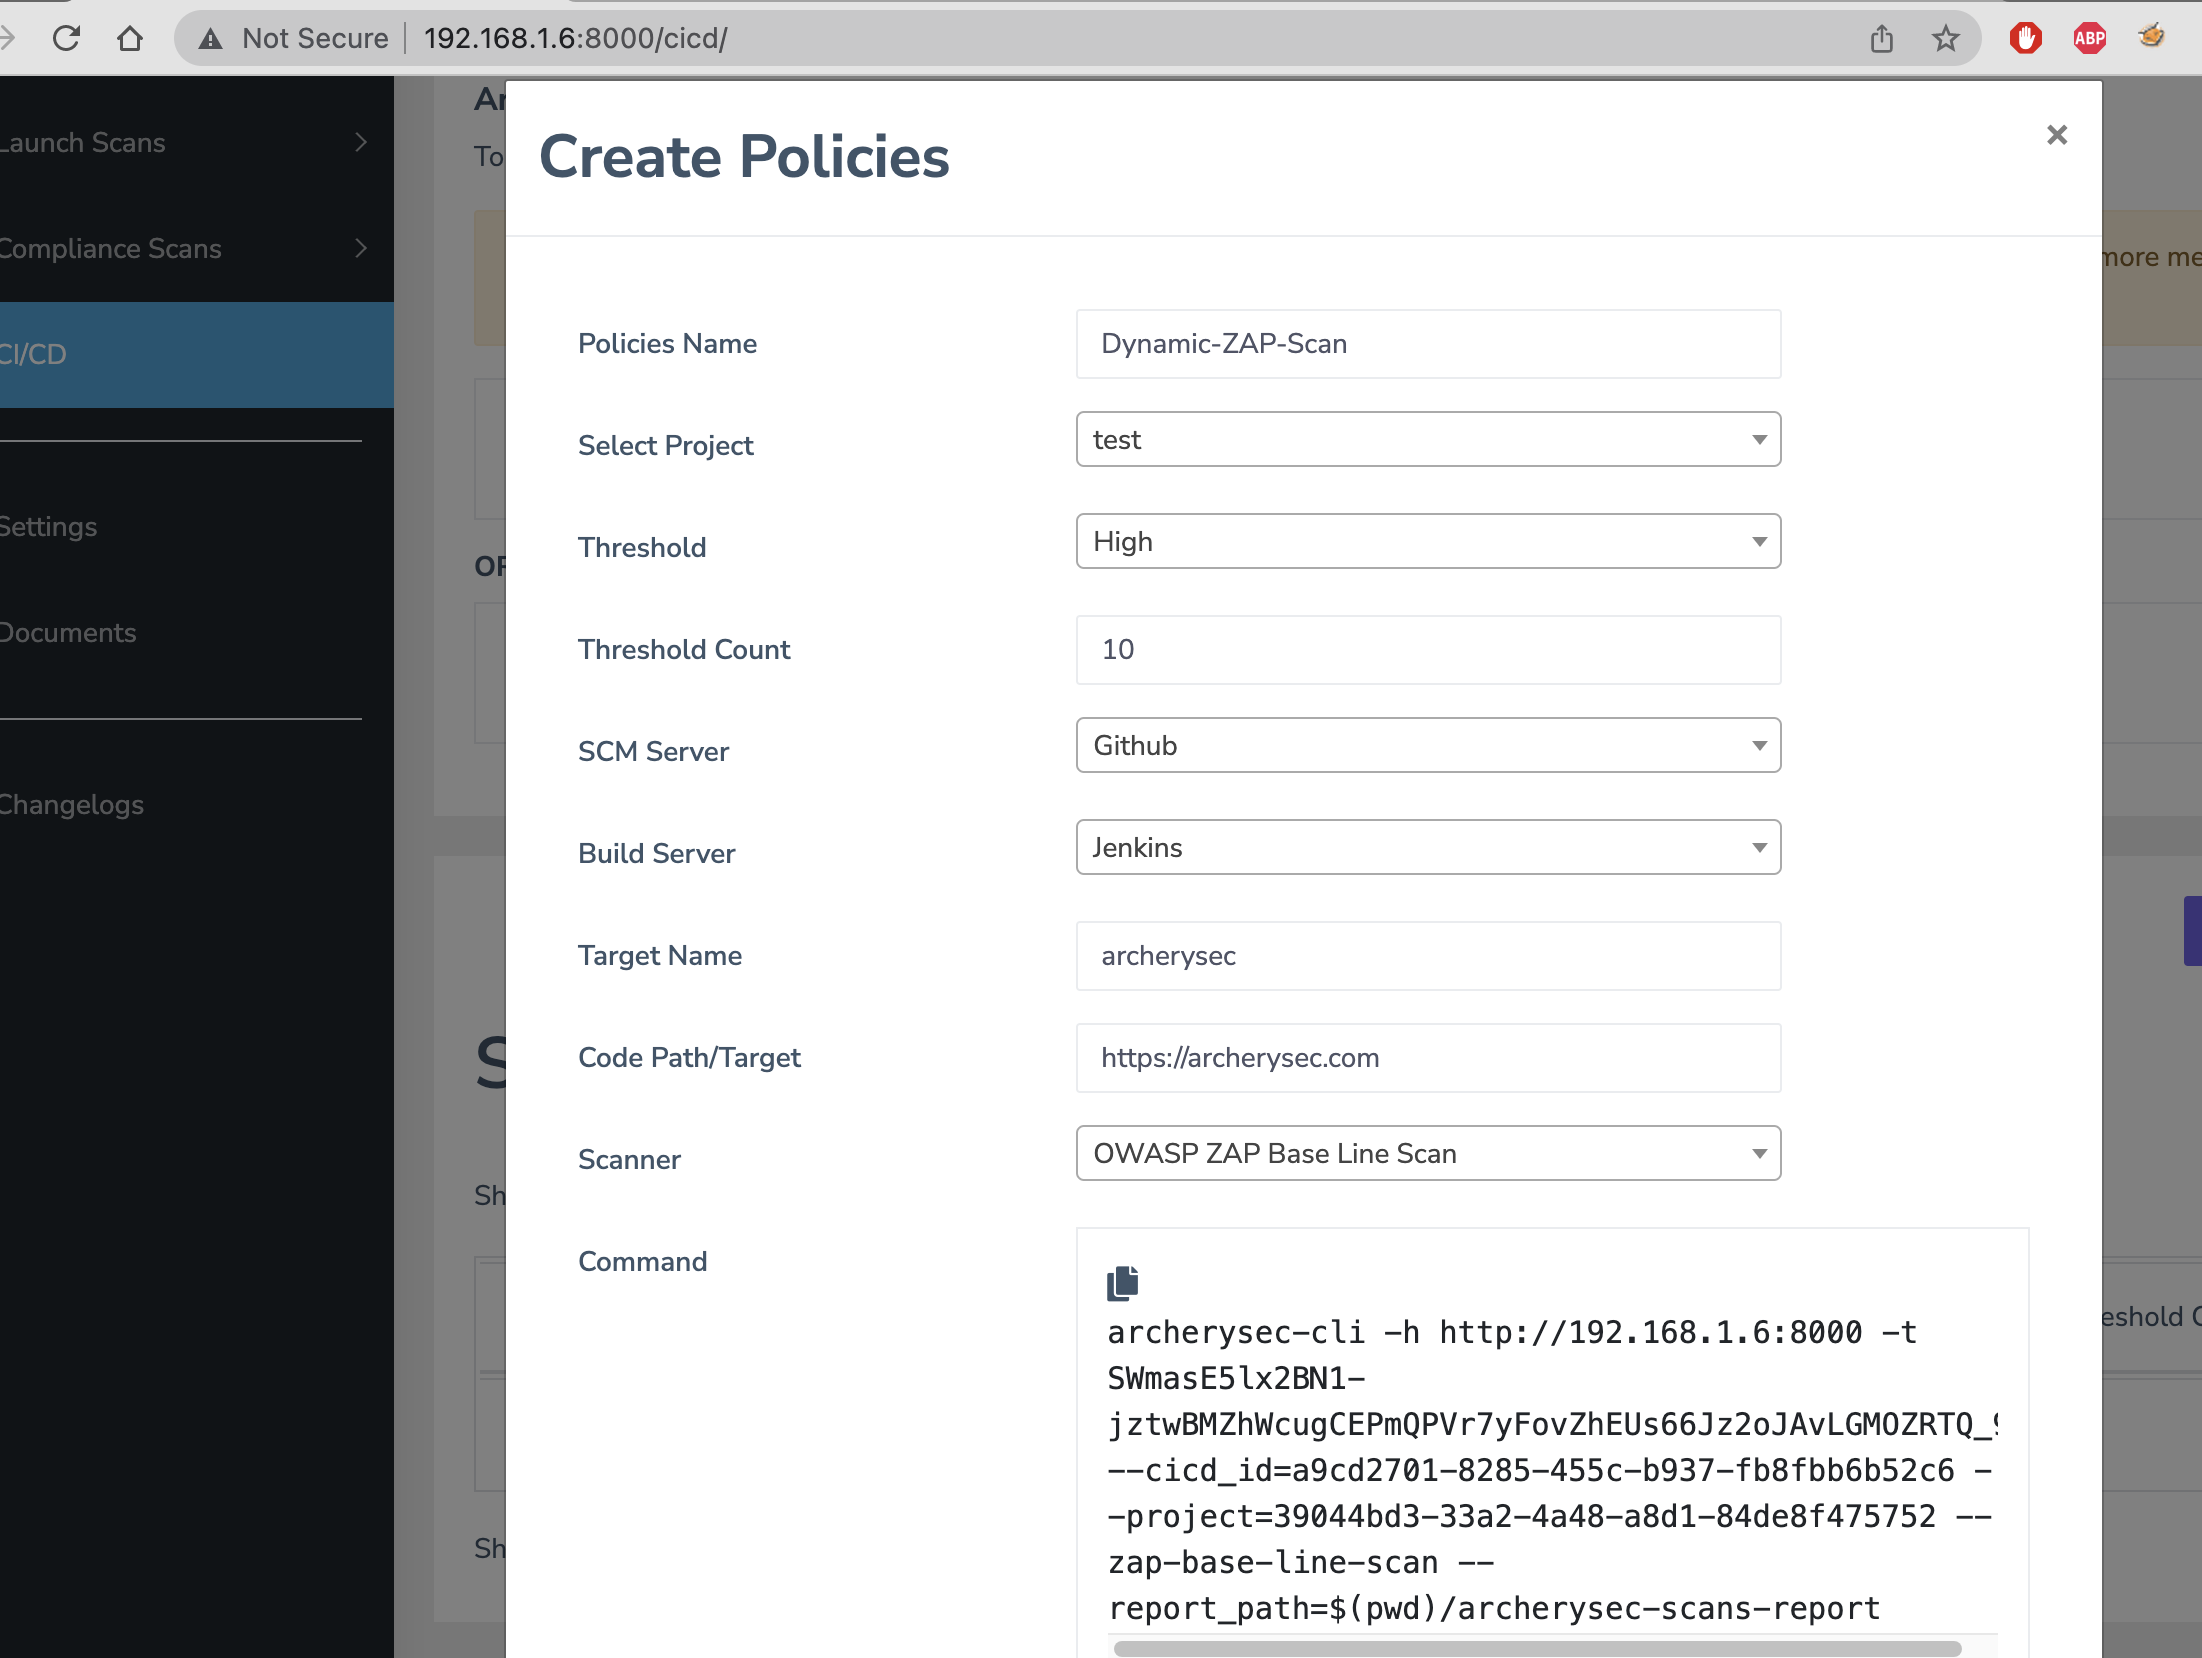
- Copy Code and Place into jenkins pipeline
- Replace the value of
--report_path=$(pwd)/archerysec-scans-report/ with --report_path=/tmp/archerysec-scans-report/
- Add Policy
Now run all these script on Jenkins CI pipeline.
- Login into Jenkins server.
- Create new job.
- Give the name of the job and select as pipeline.
- Go to pipeline section and copy paste below code.
pipeline {
  agent any
  stages {
        stage('DAST') {
          parallel {
            stage('OWASP ZAP') {
              agent any
              steps {
                sh '''
                 pip install archerysec-cli --force
                 mkdir /tmp/archerysec-scans-report
archerysec-cli -h http://192.168.1.6:8000 -t SWmasE5lx2BN1-jztwBMZhWcugCEPmQPVr7yFovZhEUs66Jz2oJAvLGMOZRTQ_9s --cicd_id=143647e0-379f-4094-9f7b-aa09db1f5e8e --project=25a7547a-aef6-4d63-a994-69ea52e79928 --zap-base-line-scan --report_path=/tmp/archerysec-scans-report/
                  '''
              }
            }
          }
        }
    }
}
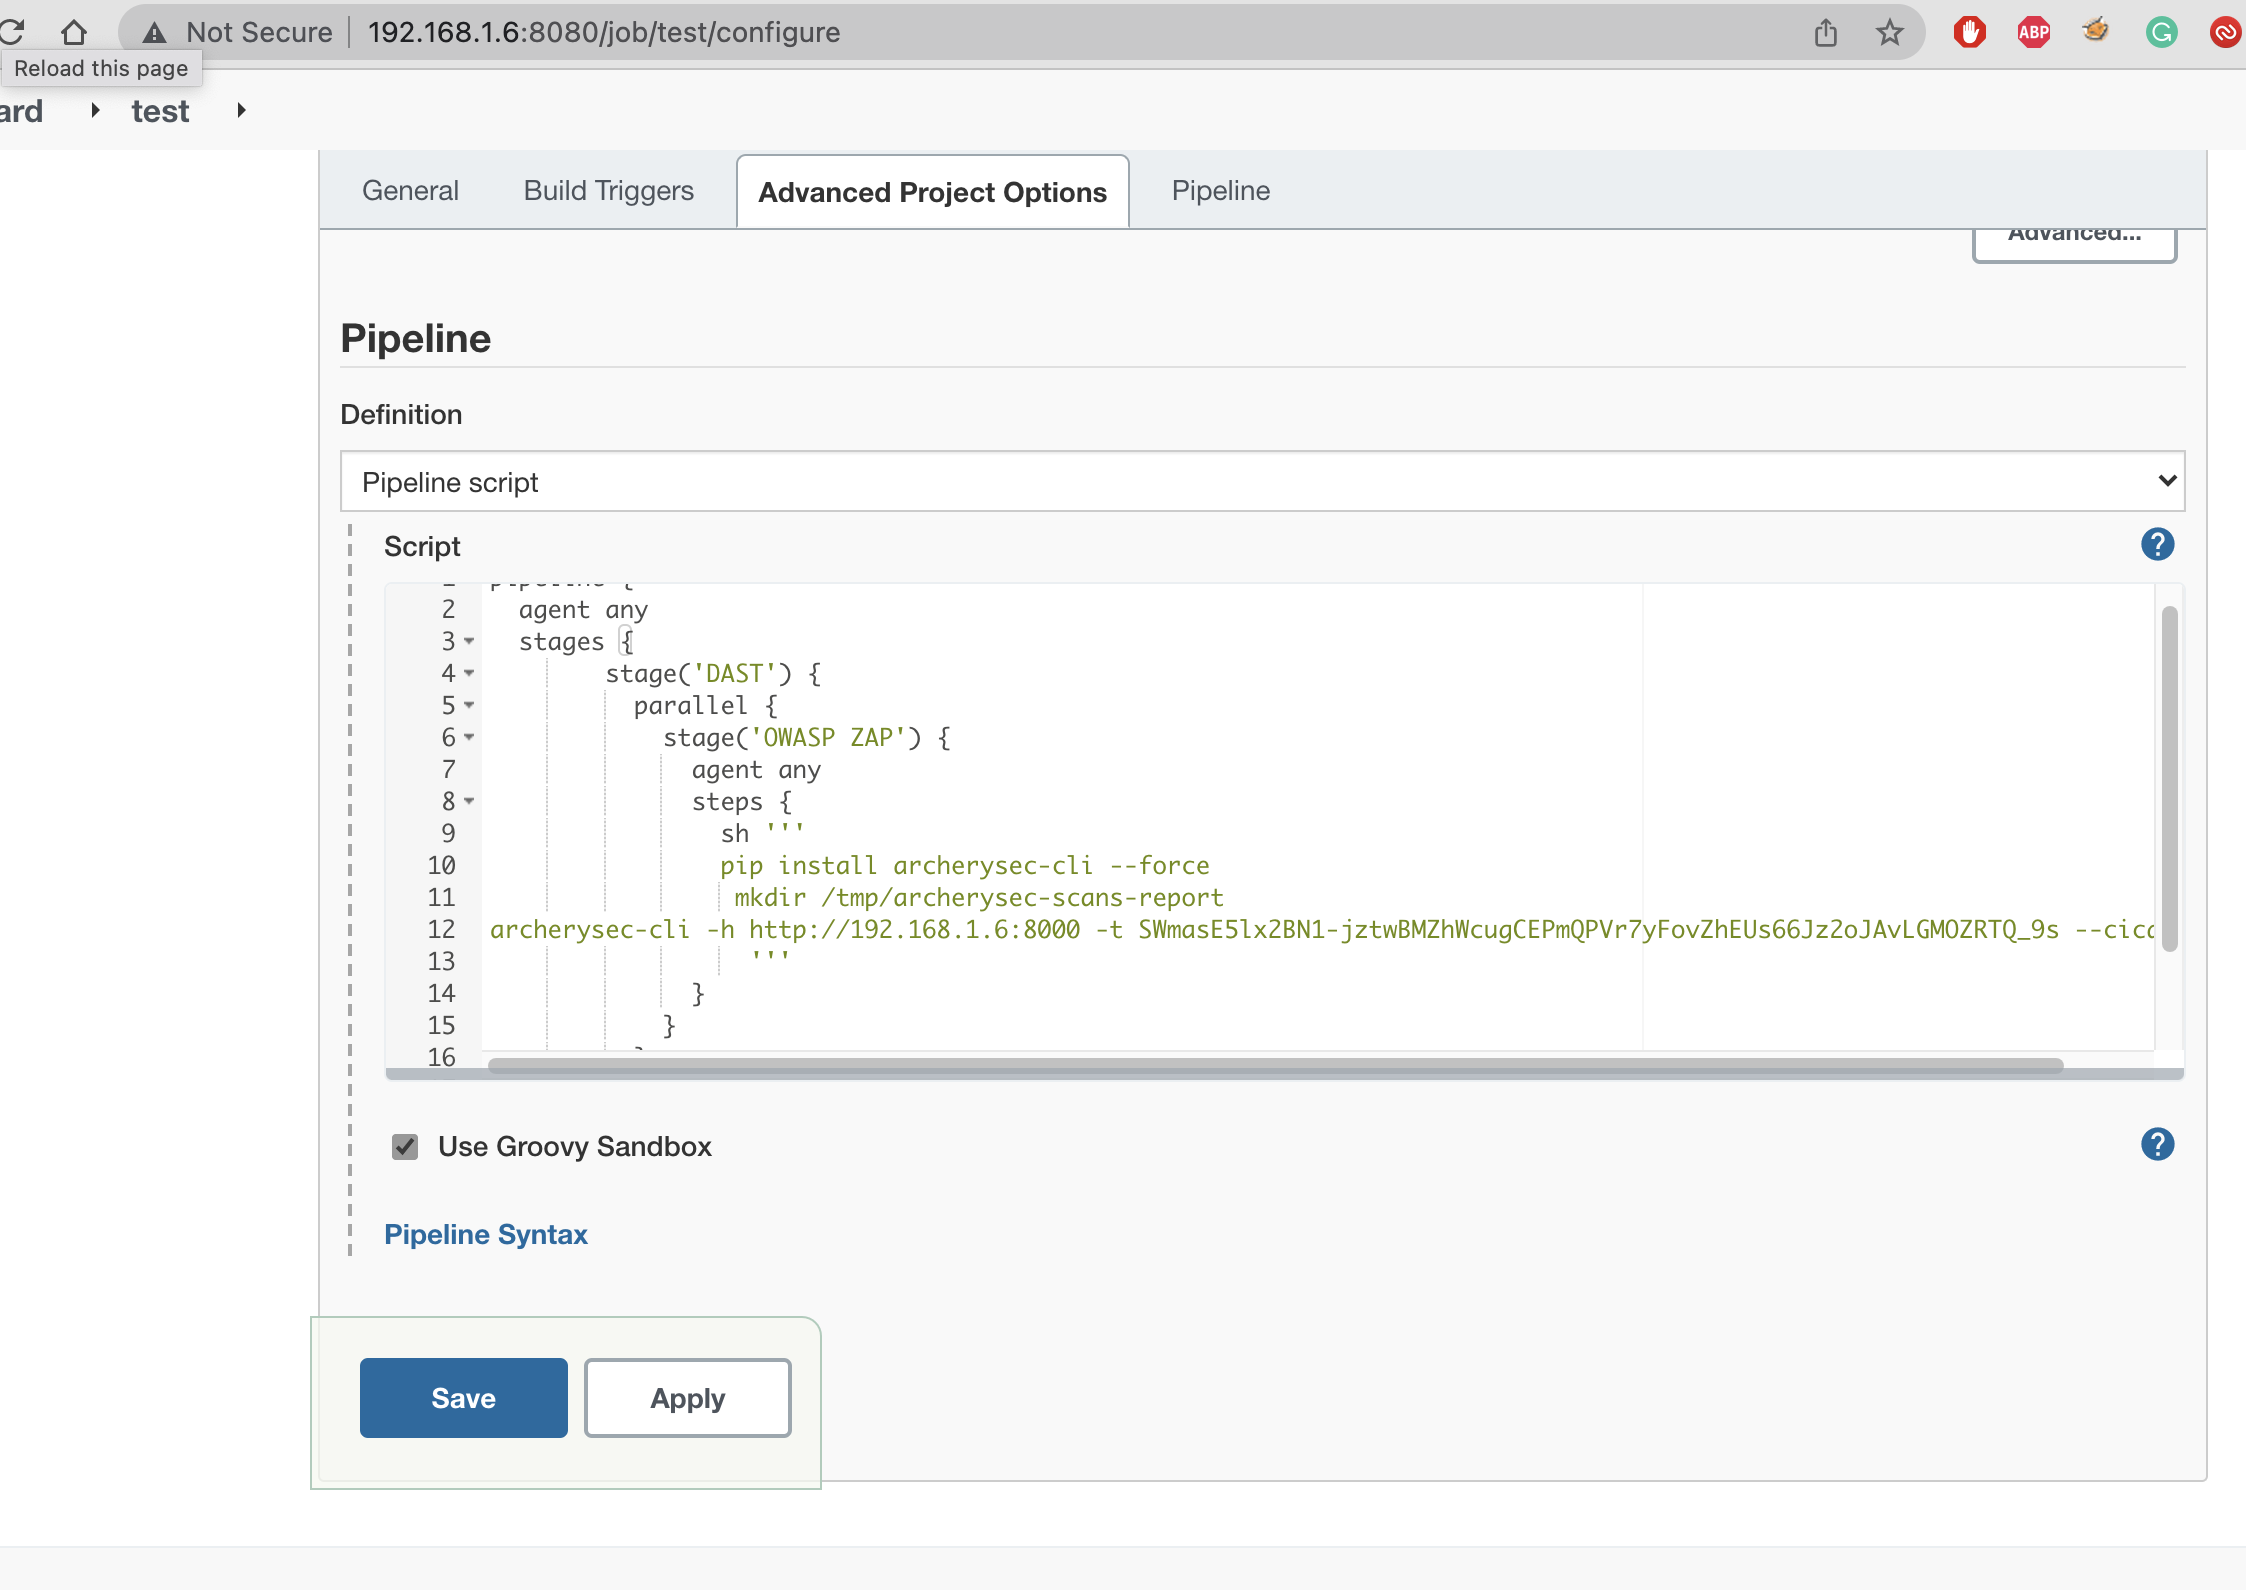
- Apply and save.
- Now click on Build Now.
- Go to Console Output and notice that the scripts are running.
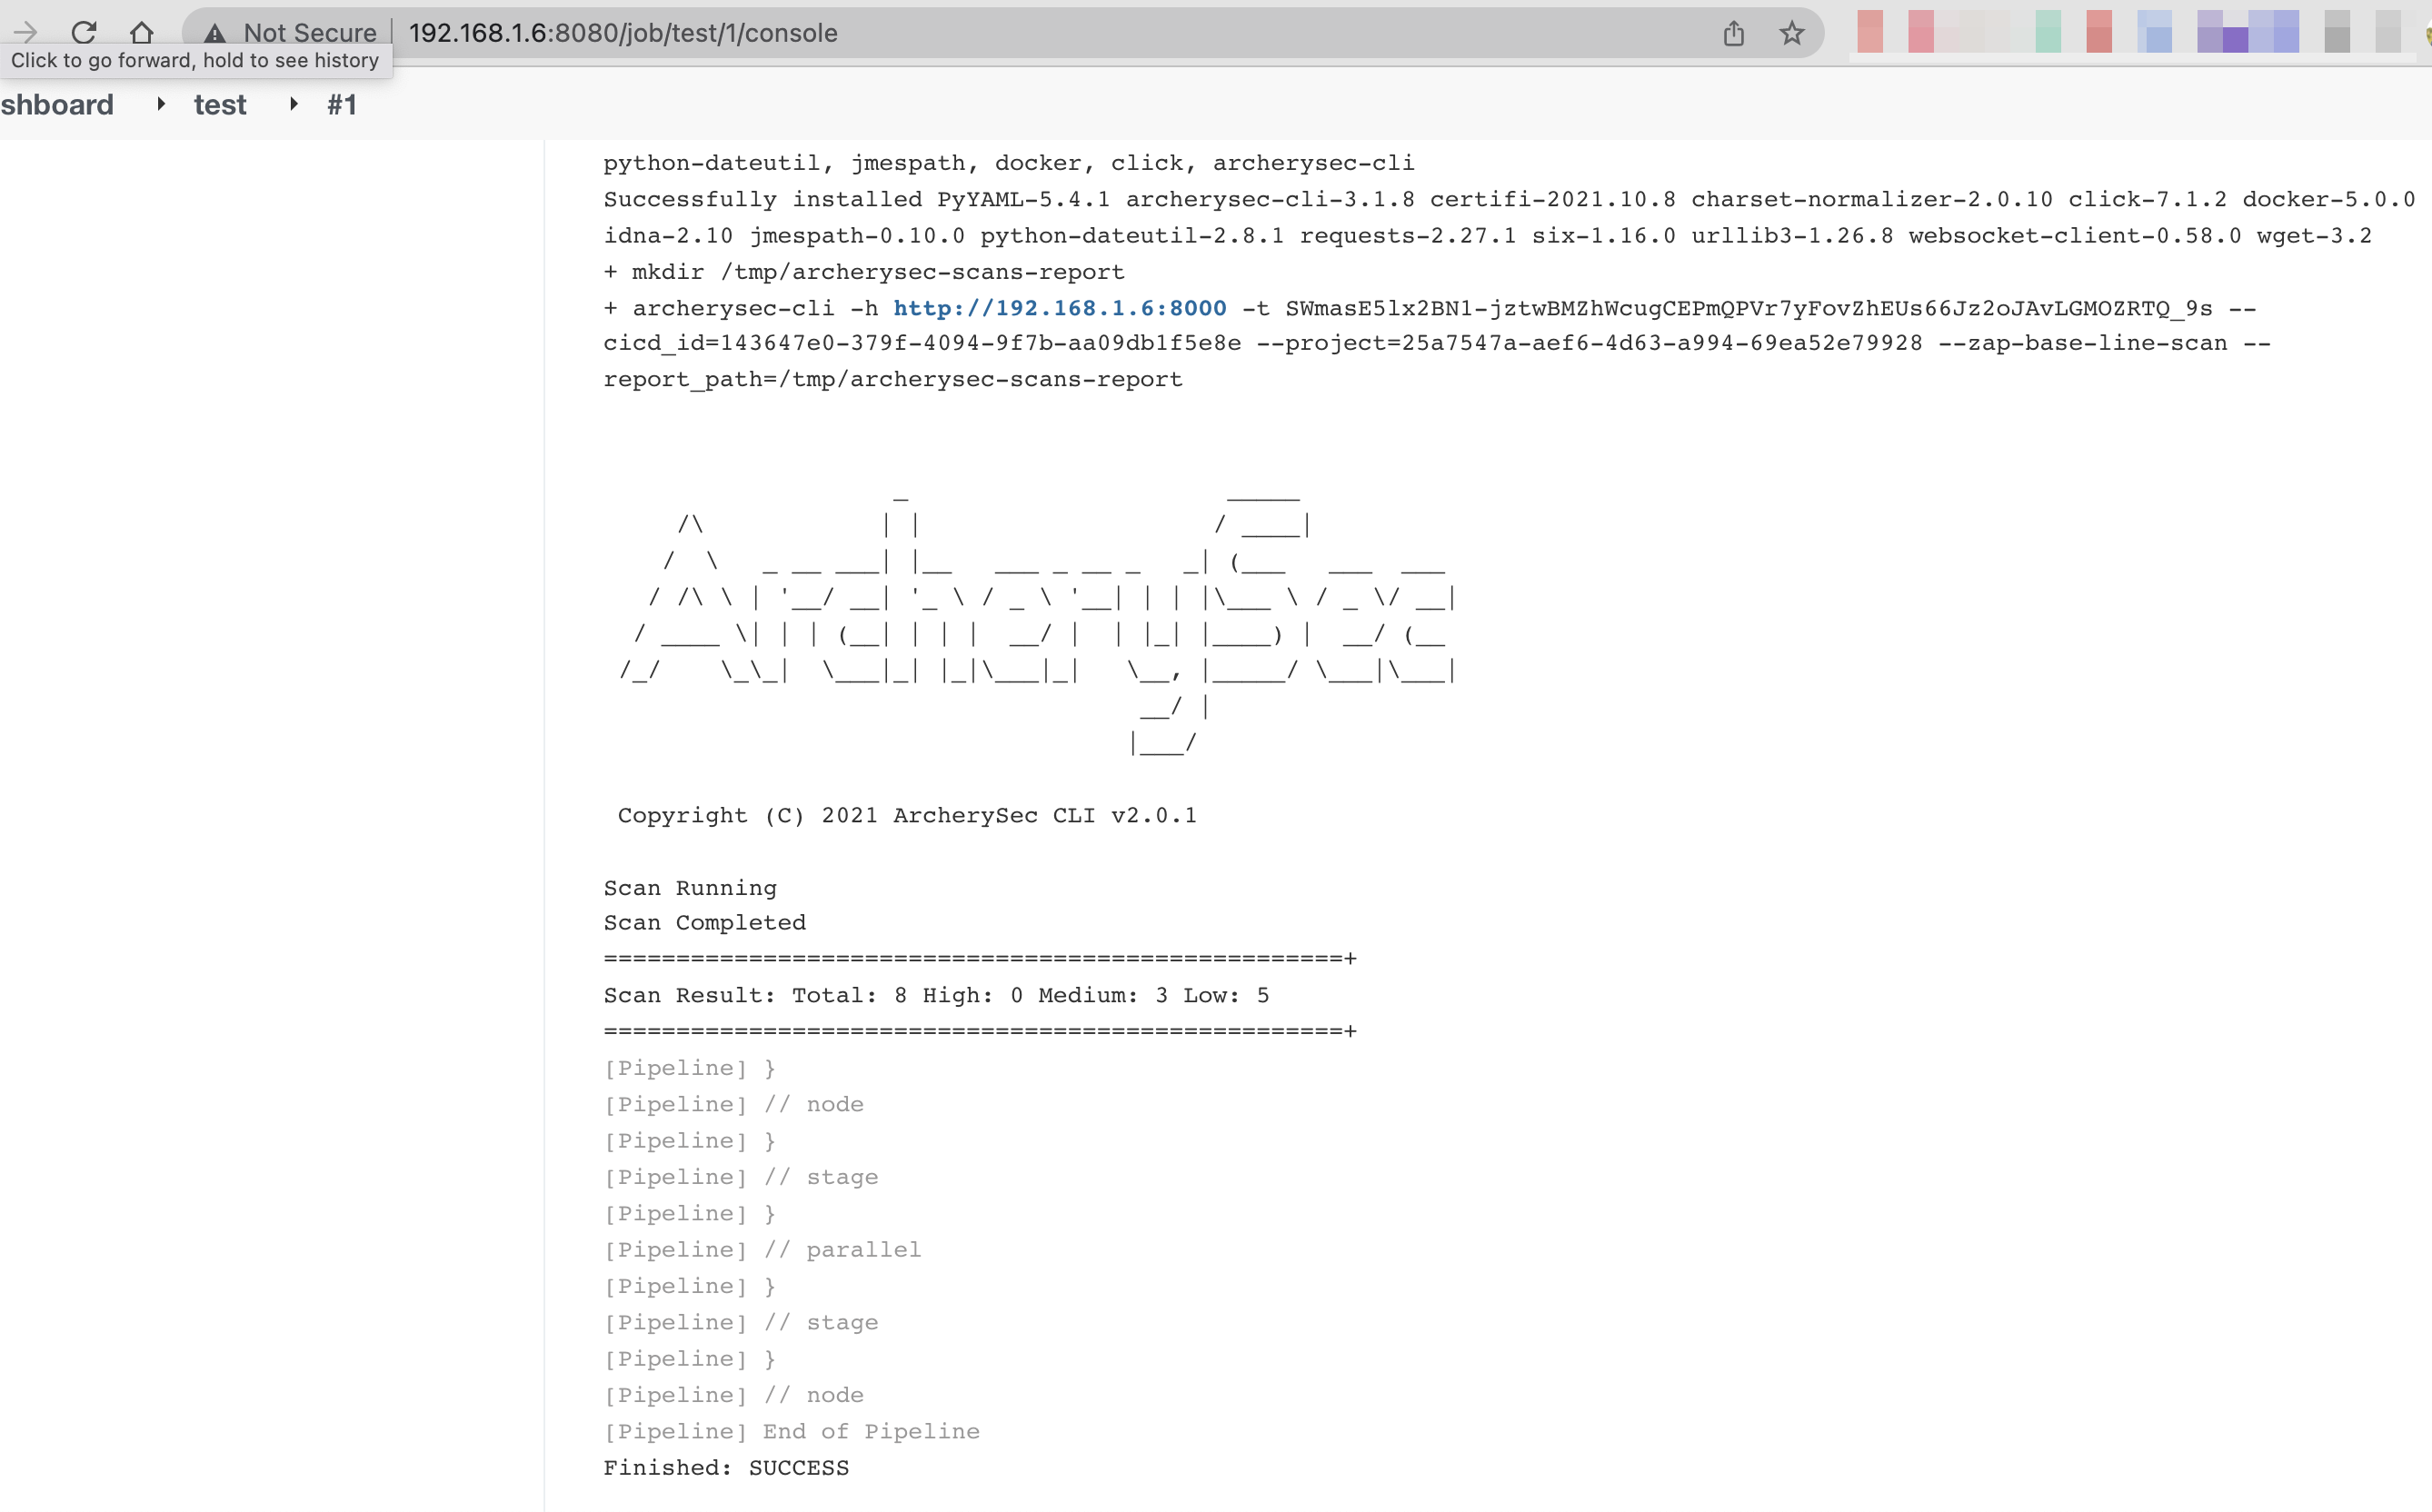
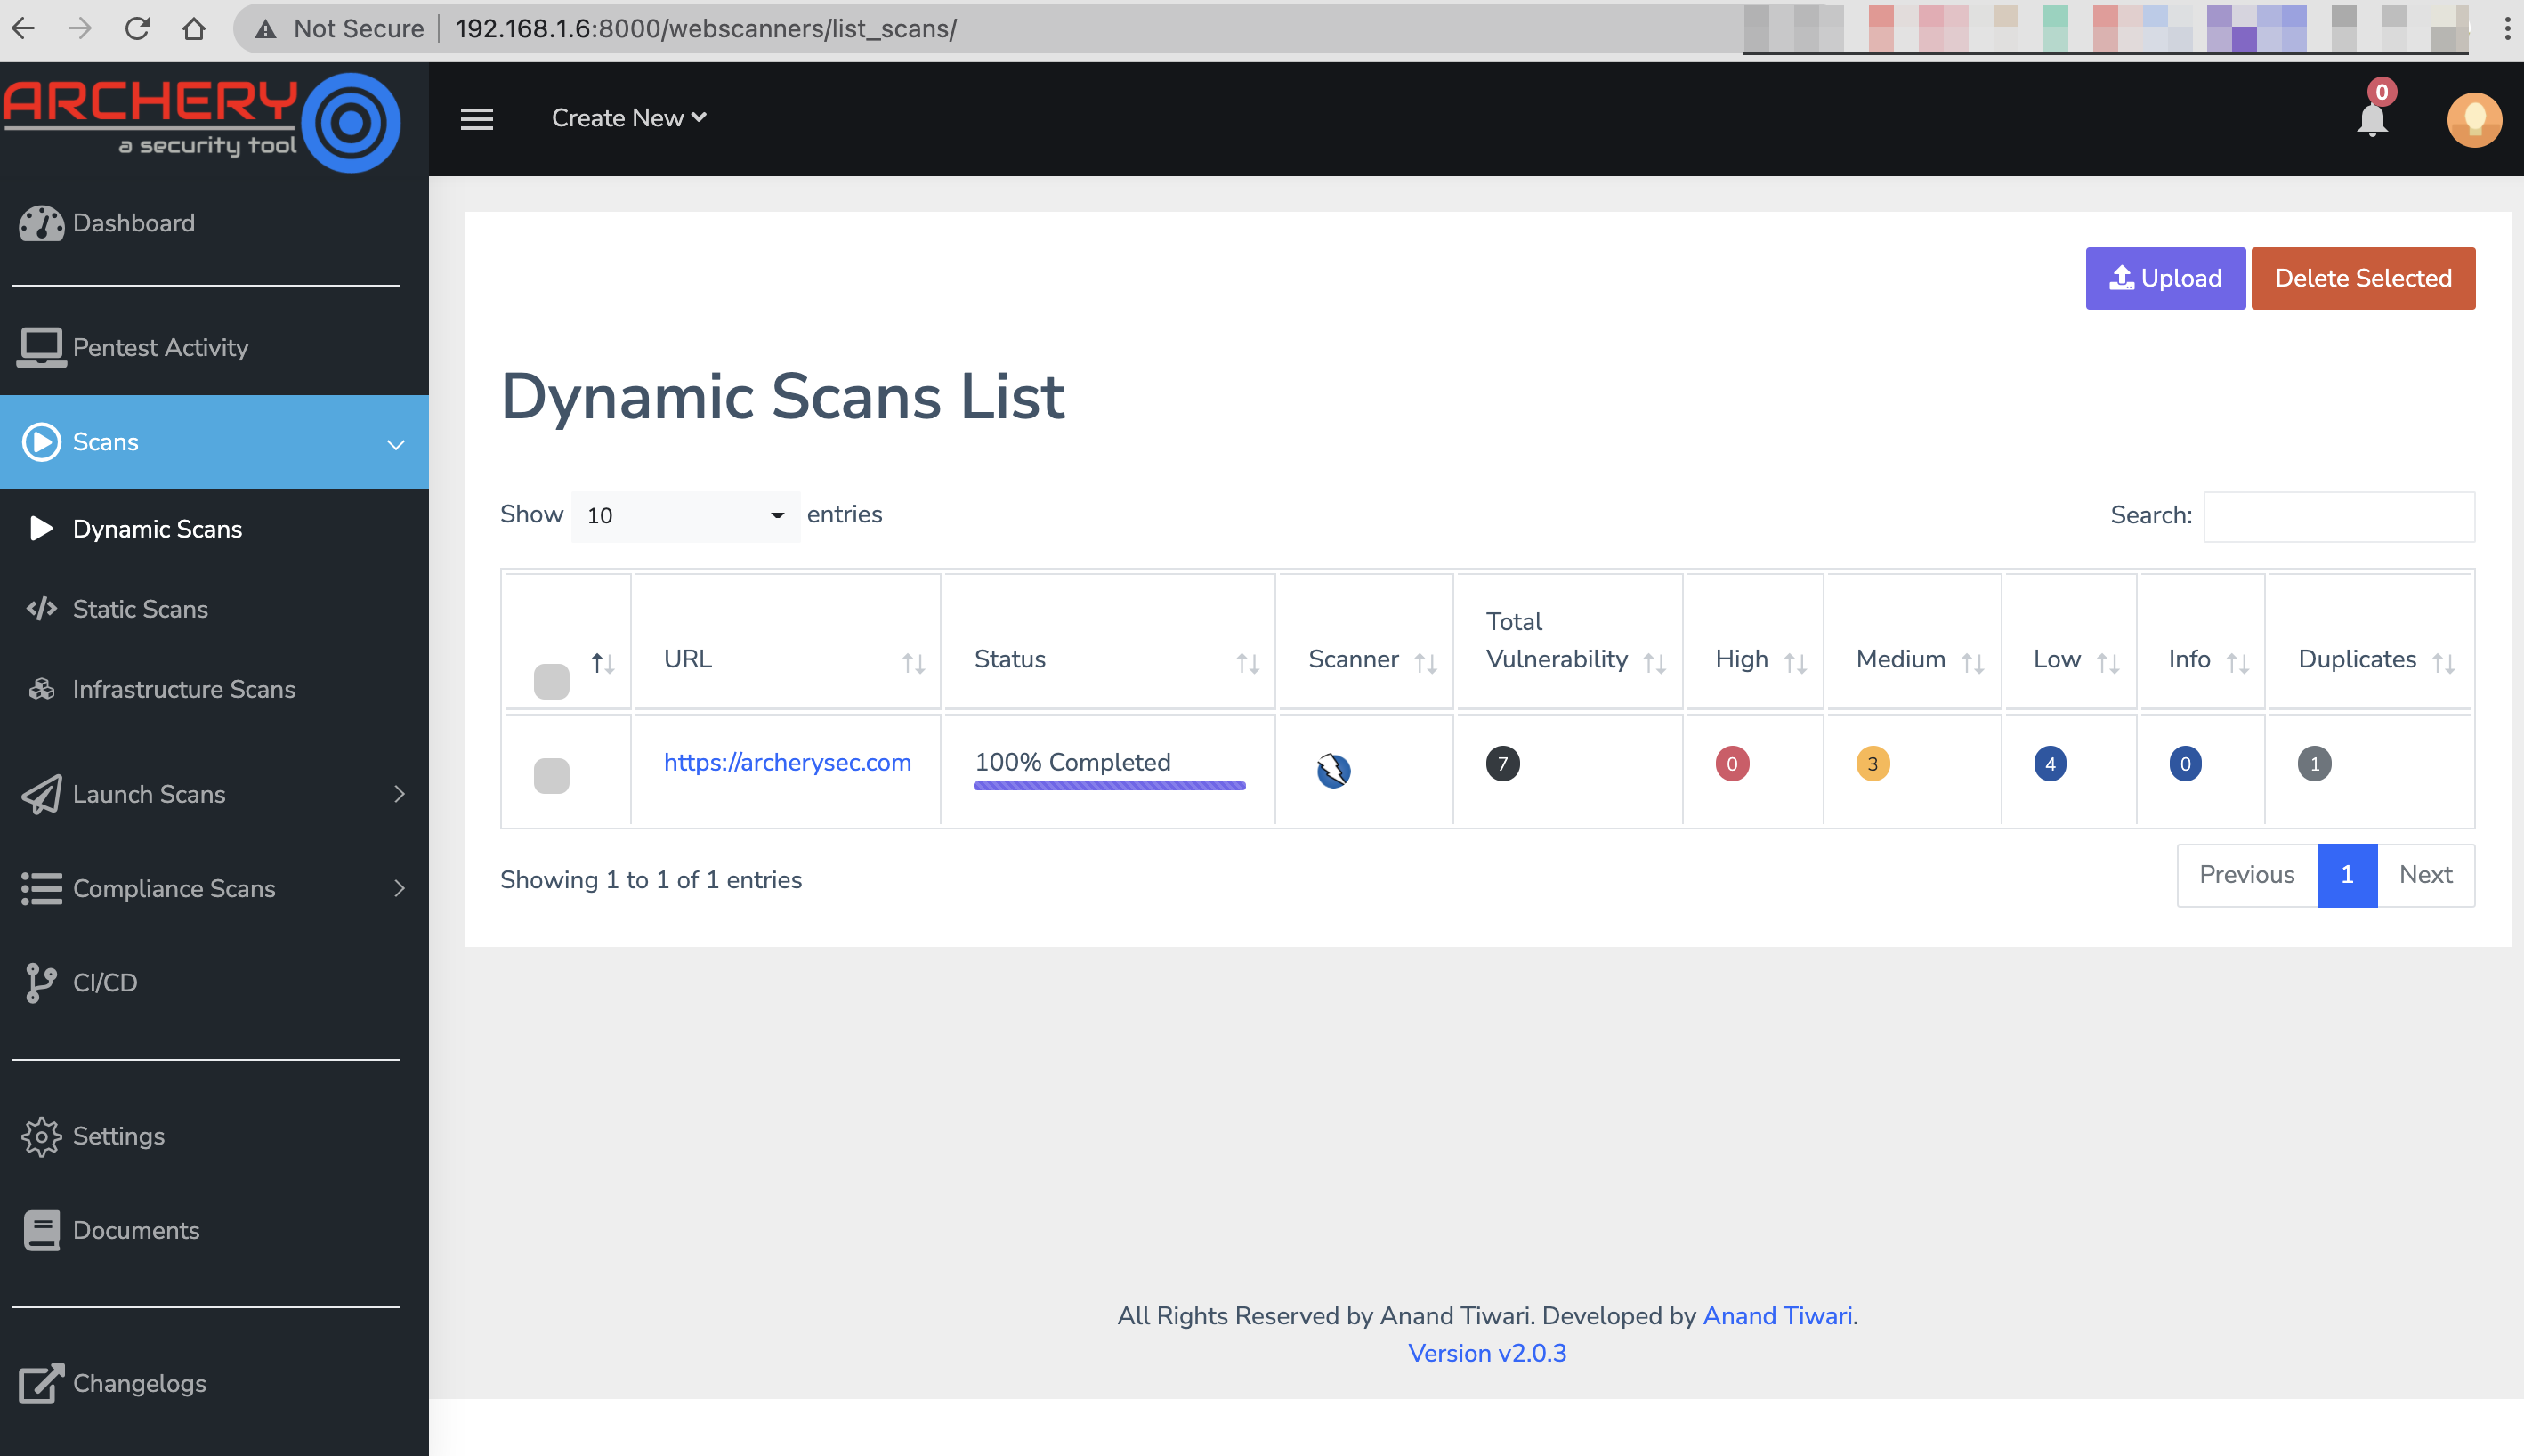
Now open ArcherySec and go to Scans > Dynamic Scans. Notice that the scan are running and given the running status % of scan.
Jenkins will now run OWASP ZAP using ArcherySec at your desired frequency and will tell you whether the build failed or succeeded. In a bigger setup, ArcherySec will be part of your build process. You can set up notifications and customize Jenkins as per your needs.
You can use a wide variety of other configurations to make your collection more dynamic.
Conclusion
Following the steps above, you will be able to set up a continuous integration process that includes ArcherySec automated Dynamic OWASP ZAP tests for the application under scan. Each commit will trigger an automated test run. Once the test run has finished, you’ll able to manage vulnerabilities using ArcherySec Tool.
Get in Touch
Send us email at info@archerysec.com
Learn More
Continuous Integration / Continuous Deployment (CI/CD) processes allow software developers to detect problems early in the development lifecycle and improve productivity with automation.
“Jenkins is a popular open-source continuous integration solution that helps teams manage the automation of software build, as well as monitor the execution of external jobs that supports the software build.”
When you run security testing in your CI/CD pipeline, you want to store vulnerability data in centralize way and manage them easily for your every single pipeline. DevOps teams are facing challenges to have a central place where they can visualize vulnerabilities transparently. Vulnerability Management is one of the challenging part for every organization.
In this article we’ll be going learn how to integrate Archery tool in your jenkins CI/CD pipeline.
"ArcherySec is an open source vulnerability assessment and management tool that helps developer and pentester to perform vulnerability assessment and manage vulnerabilities."
Archery has API that interact with Archery tool and automate vulnerability assessment process.
Archerysec-cli uses the API to interact Archery tool from console. We often use archerysec-cli in our CI/CD pipeline steps to perform scan and feed vulnerability data into Archery tool.
Configure Lab Environment:
Requirements:
- Docker & docker-compose
Steps to configure Lab Environment.
$ git clone https://github.com/archerysec/jenkins_blog.git
$ cd jenkins_blog
$ docker-compose up --build
We have written small scripts and Infrastructure as a code that allow you to spin up environment on your system.
docker-compose.yml
version: '3.6'
services:
jenkins:
build: ./jenkins
ports:
- "8080:8080"
- "50000:50000"
volumes:
- /var/run/docker.sock:/var/run/docker.sock
# - /usr/bin/docker:/usr/bin/docker
- /usr/local/bin/docker:/usr/local/bin/docker
- /tmp:/tmp
expose:
- "8080"
- "50000"
container_name: jenkins
db:
image: postgres:10.1-alpine
volumes:
- ./dbdata:/var/lib/postgresql/data
environment:
- POSTGRES_DB=archerysec
- POSTGRES_PASSWORD=archerysec
- POSTGRES_USER=archerysec
archerysec:
image: archerysec/archerysec
ports:
- "8000:8000"
expose:
- "8000"
depends_on:
- db
links:
- db:db
environment:
- DB_PASSWORD=archerysec
- DB_USER=archerysec
- NAME=user
- EMAIL=admin@user.com
- PASSWORD=admin@123A
- DB_NAME=archerysec
- DB_HOST=db
- DJANGO_SETTINGS_MODULE=archerysecurity.settings.development
- DJANGO_SECRET_KEY=${DJANGO_SECRET_KEY:-"SETME"}
- DJANGO_DEBUG=1
- EMAIL_HOST=mailhog
- EMAIL_PORT=1025
container_name: archerysec
Once containers are up and running you could check whether they are accessible or not by accessing the below URL’s.
ArcherySec: http://your_system_ip_address:8000
Jenkins: http://your_system_ip_address:8080
OWASP ZAP: http://your_system_ip_address:8090
Setup CI/CD Policy for ZAP Scanner
- Open ArcherySec portal.
- Go to settings page http://your_system_ip_address:8000
- Username:
admin@user.com - Password:
admin@123A - Click on
Add Project - Go to
CI/CDmodule - Copy Code and Place into jenkins pipeline
- Replace the value of
--report_path=$(pwd)/archerysec-scans-report/with--report_path=/tmp/archerysec-scans-report/ - Add Policy
Now run all these script on Jenkins CI pipeline.
- Login into Jenkins server.
- Create new job.
- Give the name of the job and select as pipeline.
- Go to pipeline section and copy paste below code.
pipeline {
agent any
stages {
stage('DAST') {
parallel {
stage('OWASP ZAP') {
agent any
steps {
sh '''
pip install archerysec-cli --force
mkdir /tmp/archerysec-scans-report
archerysec-cli -h http://192.168.1.6:8000 -t SWmasE5lx2BN1-jztwBMZhWcugCEPmQPVr7yFovZhEUs66Jz2oJAvLGMOZRTQ_9s --cicd_id=143647e0-379f-4094-9f7b-aa09db1f5e8e --project=25a7547a-aef6-4d63-a994-69ea52e79928 --zap-base-line-scan --report_path=/tmp/archerysec-scans-report/
'''
}
}
}
}
}
}
- Apply and save.
- Now click on Build Now.
- Go to Console Output and notice that the scripts are running.
Now open ArcherySec and go to Scans > Dynamic Scans. Notice that the scan are running and given the running status % of scan.
Jenkins will now run OWASP ZAP using ArcherySec at your desired frequency and will tell you whether the build failed or succeeded. In a bigger setup, ArcherySec will be part of your build process. You can set up notifications and customize Jenkins as per your needs. You can use a wide variety of other configurations to make your collection more dynamic.
Conclusion
Following the steps above, you will be able to set up a continuous integration process that includes ArcherySec automated Dynamic OWASP ZAP tests for the application under scan. Each commit will trigger an automated test run. Once the test run has finished, you’ll able to manage vulnerabilities using ArcherySec Tool.
Get in Touch
Send us email at info@archerysec.com
Learn More