
Deploy ArcherySec as a Serverless on AWS using Zappa
ArcherySec is handy tool to feed vulnerability data from DevSecOps pipeline. Vulnerability management is a key part of your DevSecOps process. In our last blog post, we saw how to integrate ArcherySec in our CI/CD pipeline. In this blog post we’ll see how ArcherySec can be deployed as a serverless.
We often heard about “serverless” in computer world. Serverless is a cloud computing performance model where the cloud provider dynamically controls the allocation and provisioning of servers. A serverless application works in stateless compute containers that are event-prompted, temporary, and completely handled by the cloud provider. The pricing in the serverless is based on the count of executions rather than pre-purchased compute capacity.
Think how if your vulnerability management application is serverless and event-driven. We need ArcherySec API when we are feeding data from our DevSecOps pipeline or when we are analyzing vulnerabilities. Hosting ArcherySec application on an EC2 Instance or in containers like ECS make us pay for the idle time too.
In this article we will guide you to deploy a ArcherySec application as server-less using Zappa. Before start deploying ArcherySec application lets understand how Zappa works.
Zappa
Zappa is an open source project that helps you in building and deploying server-less, event-driven Python applications. It helps in deploying and building any WSGI compatible applications that are developed in python. It uses AWS Lambda and AWS API Gateway, and Amazon S3.
When we talk about application hosted on server-less, basically it’s not really serverless, there still is a webserver in a cloud that serving your web responses. The difference is the server life spent is measured in milliseconds. The entire life cycle of a server is within a single HTTP request.
In a traditional client server communication the client makes a request to the web server, calls the application HTML, CSS, etc and code sends back a response to the browser. The server should be up and running 24/7 just waiting for requests and responses.
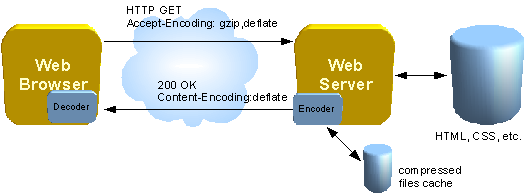
Source: https://www.codeproject.com/KB/aspnet/HttpZipFolder/HttpZipFolder_Fig2.png
With AWS Lambda + AWS API Gateway when the HTTP request comes in through the AWS API Gateway, then it creates the instance of the AWS Lambda function which process the request returns through the AWS API Gateway and then the server is wiped out. So you have used a server in a matter of milliseconds and a major advantage of this approach is that you don’t have to worry about keeping your server up and running 24/7 and you only pay aws instance for a millisecond.
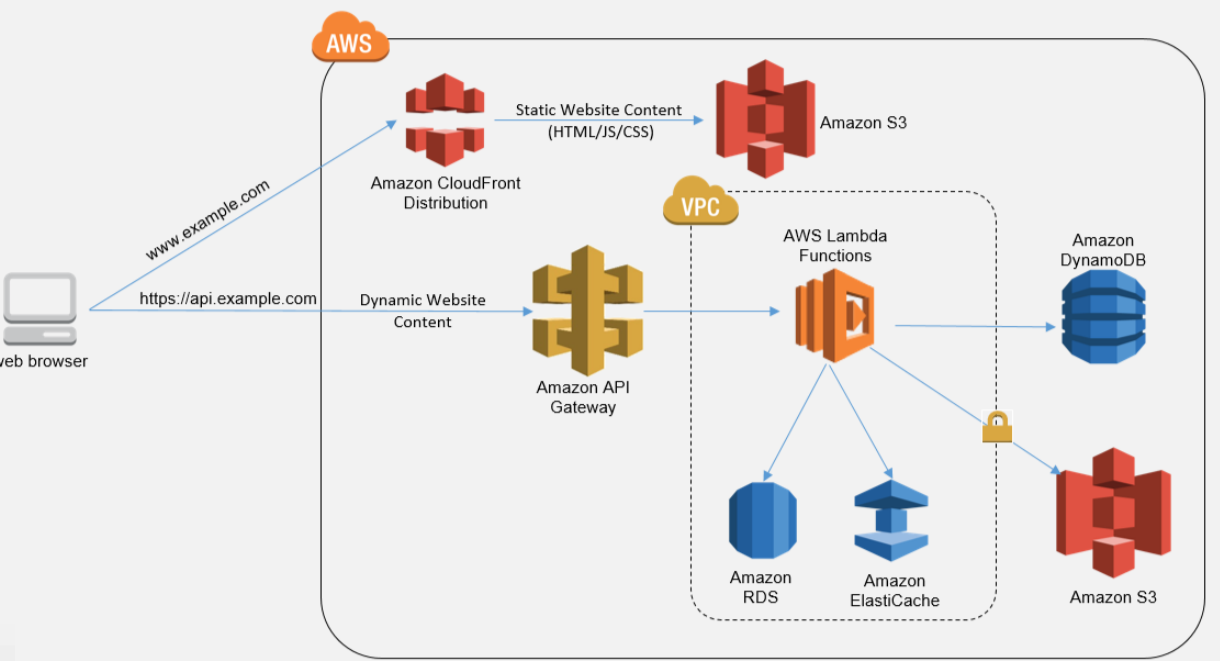
Source: https://medium.com/38th-street-studios/the-move-to-serverless-digital-ocean-heroku-aws-oh-my-ea5224a8d4bb
AWS Lambda
AWS Lambda lets you run code without provisioning or managing servers. You pay only for the compute time you consume, there is no charge when your code is not running.
So AWS Lambda function is perfect solution for us. It scales automatically and we pay only when we consume it. If our code is not running then it’s not chargeable. Also its running with zero administration.
Configure AWS Credentials
Before start using AWS, we have to make sure we have a valid AWS account and have the AWS access-key which we are going to use in our environment.
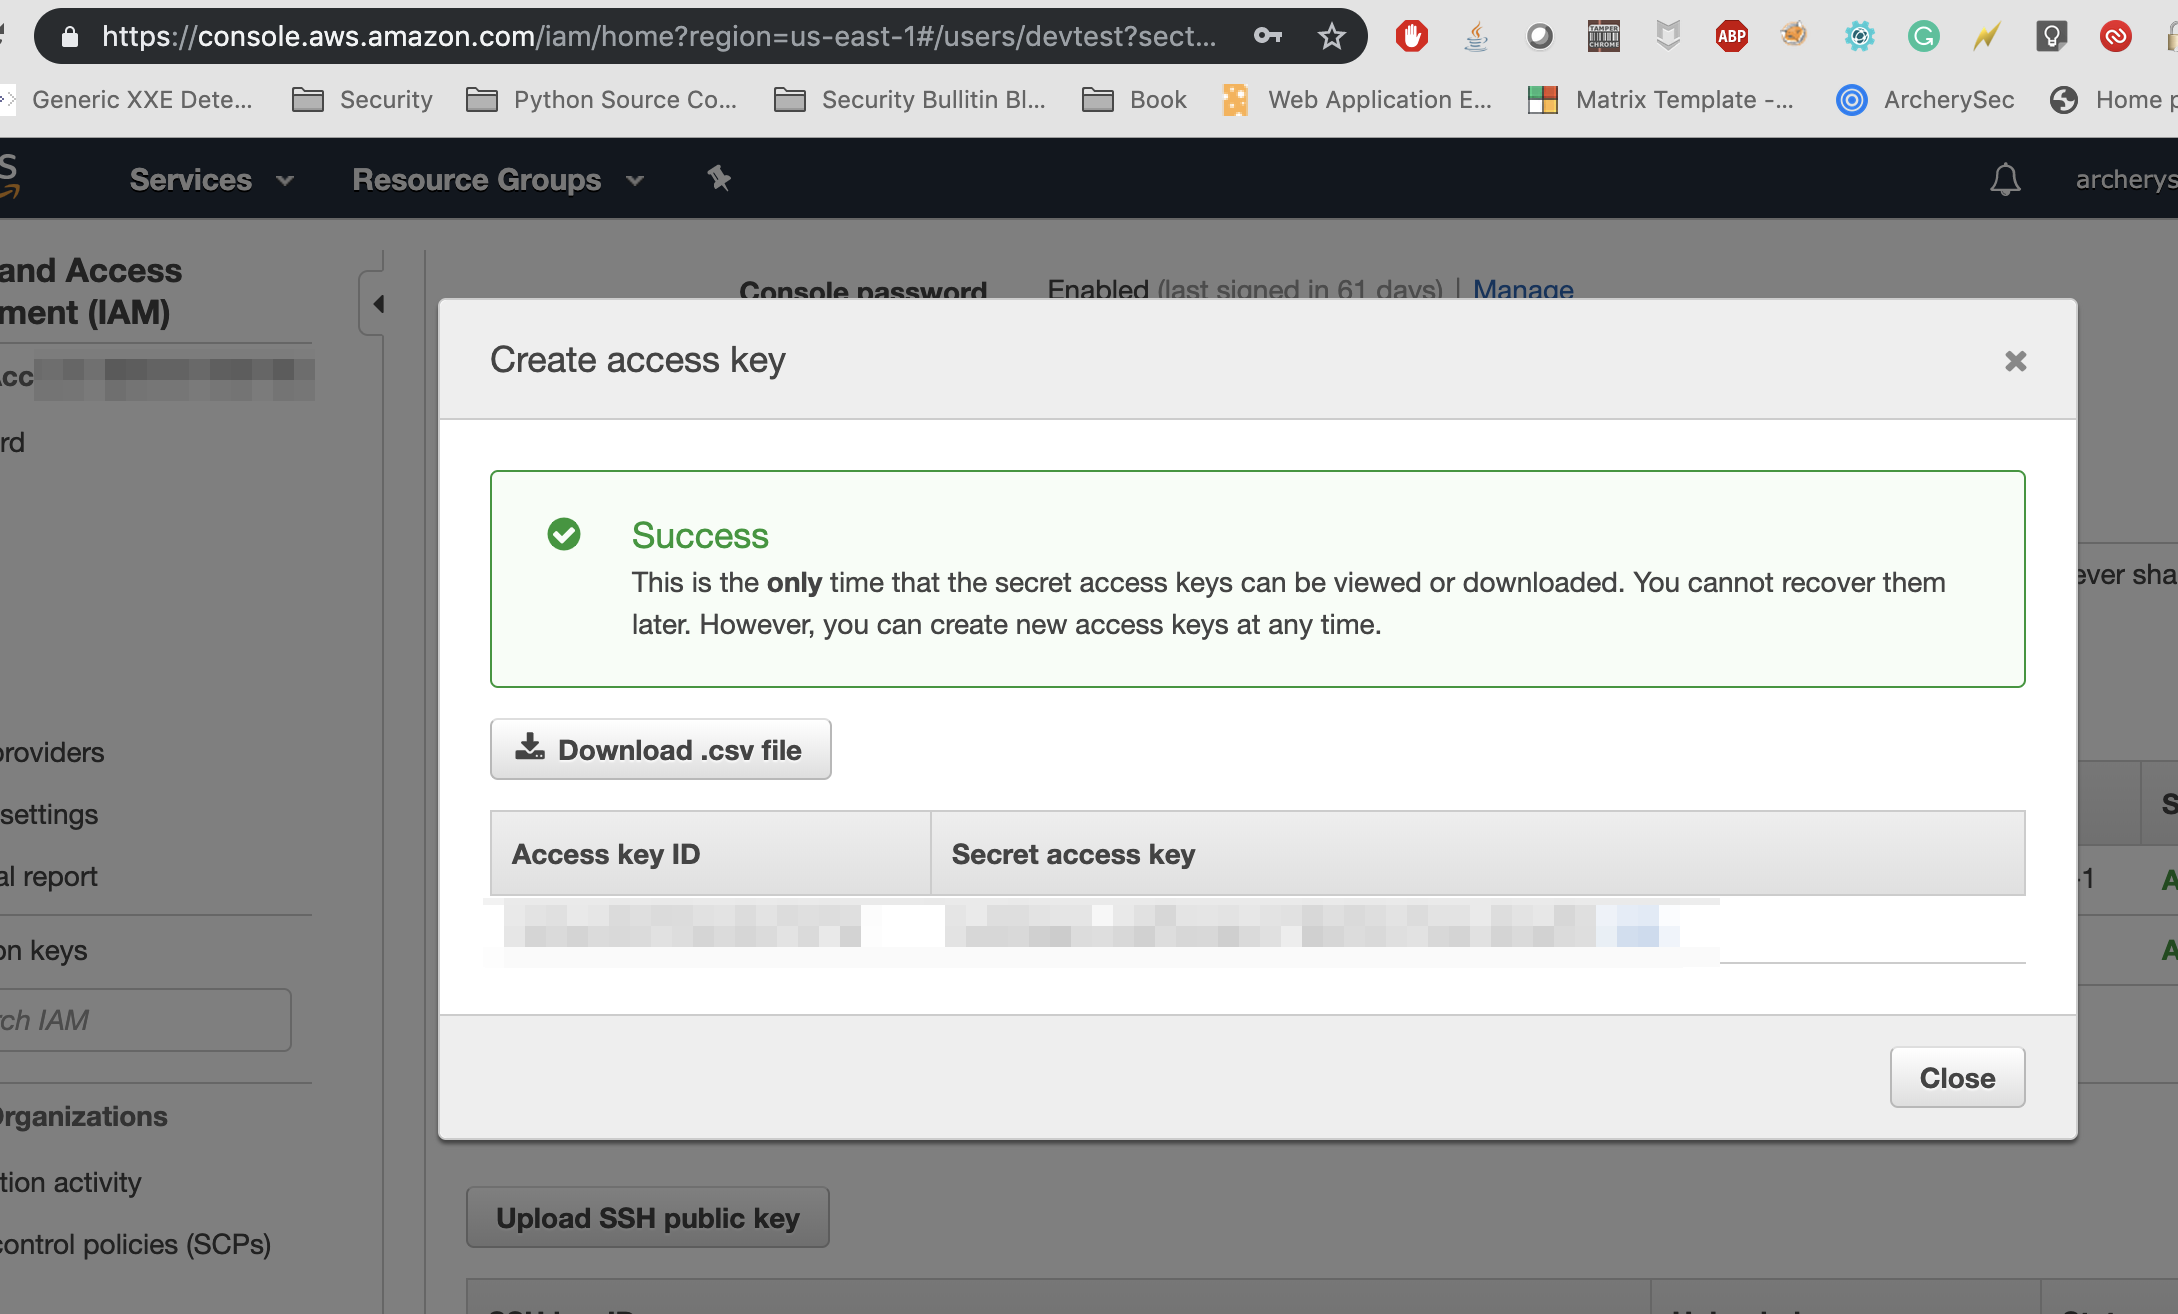
Get the access key from IAM
- Go to IAM console and navigate to users.
- Go to Security Credentials
- Create access key and note down the value of “Access key ID” & “Secret access key”.
- Create a folder called aws at the root level.
mkdir .aws
###~/.aws/credentials

[default]
aws_access_key_id = XXXXXXXXXXXXXXXXXXXXXXXXXXXX
aws_secret_access_key = XXXXXXXXXXXXXXXXXXXXXXXXXXXX
Permissions
Make sure you have provided correct permissions to the user. We need following permission to run Zappa.
- AWSLambda
- AmazonS3
- AmazonAPIGateway
- AWSDeepRacerCloudFormationAccessPolicy
- AmazonEC2
Roles
We need to create role and provide the appropriate permissions. Zapp configuration file will use and deploy applications on Lambda and API gateway.
- Go to Roles and create new role.
- Attached the following policies
- AWSLambda
- AmazonAPIGatewayPushToCloudWatchLogs
- AWSLambdaVPCAccessExecutionRole
- Move to Trust Relationship and Edit Trust Relationship.
- Copy and paste the below code.
{
  "Version": "2012-10-17",
  "Statement": [
    {
      "Sid": "",
      "Effect": "Allow",
      "Principal": {
        "Service": [
          "events.amazonaws.com",
          "lambda.amazonaws.com",
          "apigateway.amazonaws.com"
        ]
      },
      "Action": "sts:AssumeRole"
    }
  ]
}
We need to trust the amazonaws events, lambda and apigateway end points.
- Note down Role Name and Role ARN as we need in Zappa configuration file.
Deploy ArcherySec Application Using Zappa
Clone ArcherySec project folder in our local system.
$ git clone https://github.com/archerysec/archerysec.git
$ cd archerysec
Install ArcherySec required library
$ pip install -r requirements-zappa.txt
After installing Zappa, let’s configure Zappa
$ zappa init
which will ask us for the following:
- Name of environment - default ‘dev’
- S3 bucket for deployments. If the bucket does not exist, zappa will create it for us. Zappa uses this bucket to hold the zappa package temporarily while it is being transferred to AWS lambda, which is then deleted after deployment.
- Project’s settings provide as
archerysecurity.settings.base
Some additional parameter required by Zappa configuration file.
- Edit the zappa_settings.json file
- Provide the aws_region: us-east-1
- Manage_roles: false
- role_name:
- role_arn:
Zappa configuration file
{
    "dev": {
	"aws_region": "us-east-1",
        "django_settings": "archerysecurity.settings.base",
        "profile_name": "default",
        "project_name": "archerysec-aws",
        "runtime": "python2.7",
        "s3_bucket": "zappa-test",
	"manage_roles": false,
	"role_name": "archerysectest",
	"role_arn": "arn:aws:iam::868167788748:role/archerysectest",
    }
}
Now let us deploy the app
$ zappa deploy dev

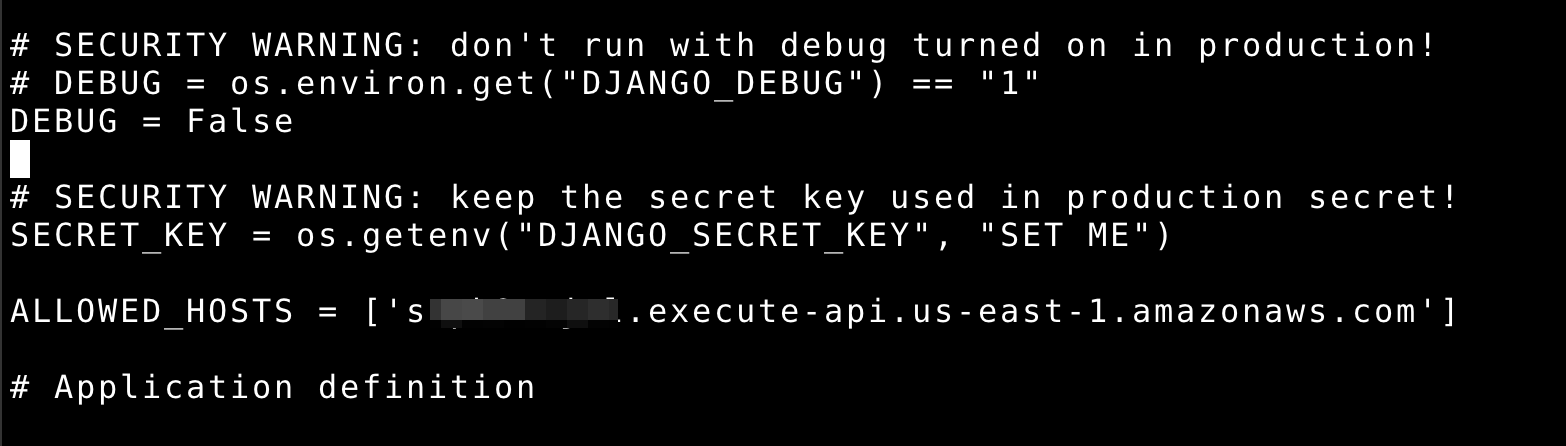
Now you need to add your AWS API Gateway host as allowed host in application settings file and disable debugging by marking it as False.
- Edit settings file:
archerysecurity/settings/base.py
- DEBUG = False
- Replace * with your host in Allowed host
ALLOWED_HOSTS = ['your_api_gateway_host']
- Add below lines in setting file
archerysecurity/settings/base.py
FORCE_SCRIPT_NAME = "/dev/"

LOGIN_URL = FORCE_SCRIPT_NAME + 'login/'
- Update code by running command
zappa update dev
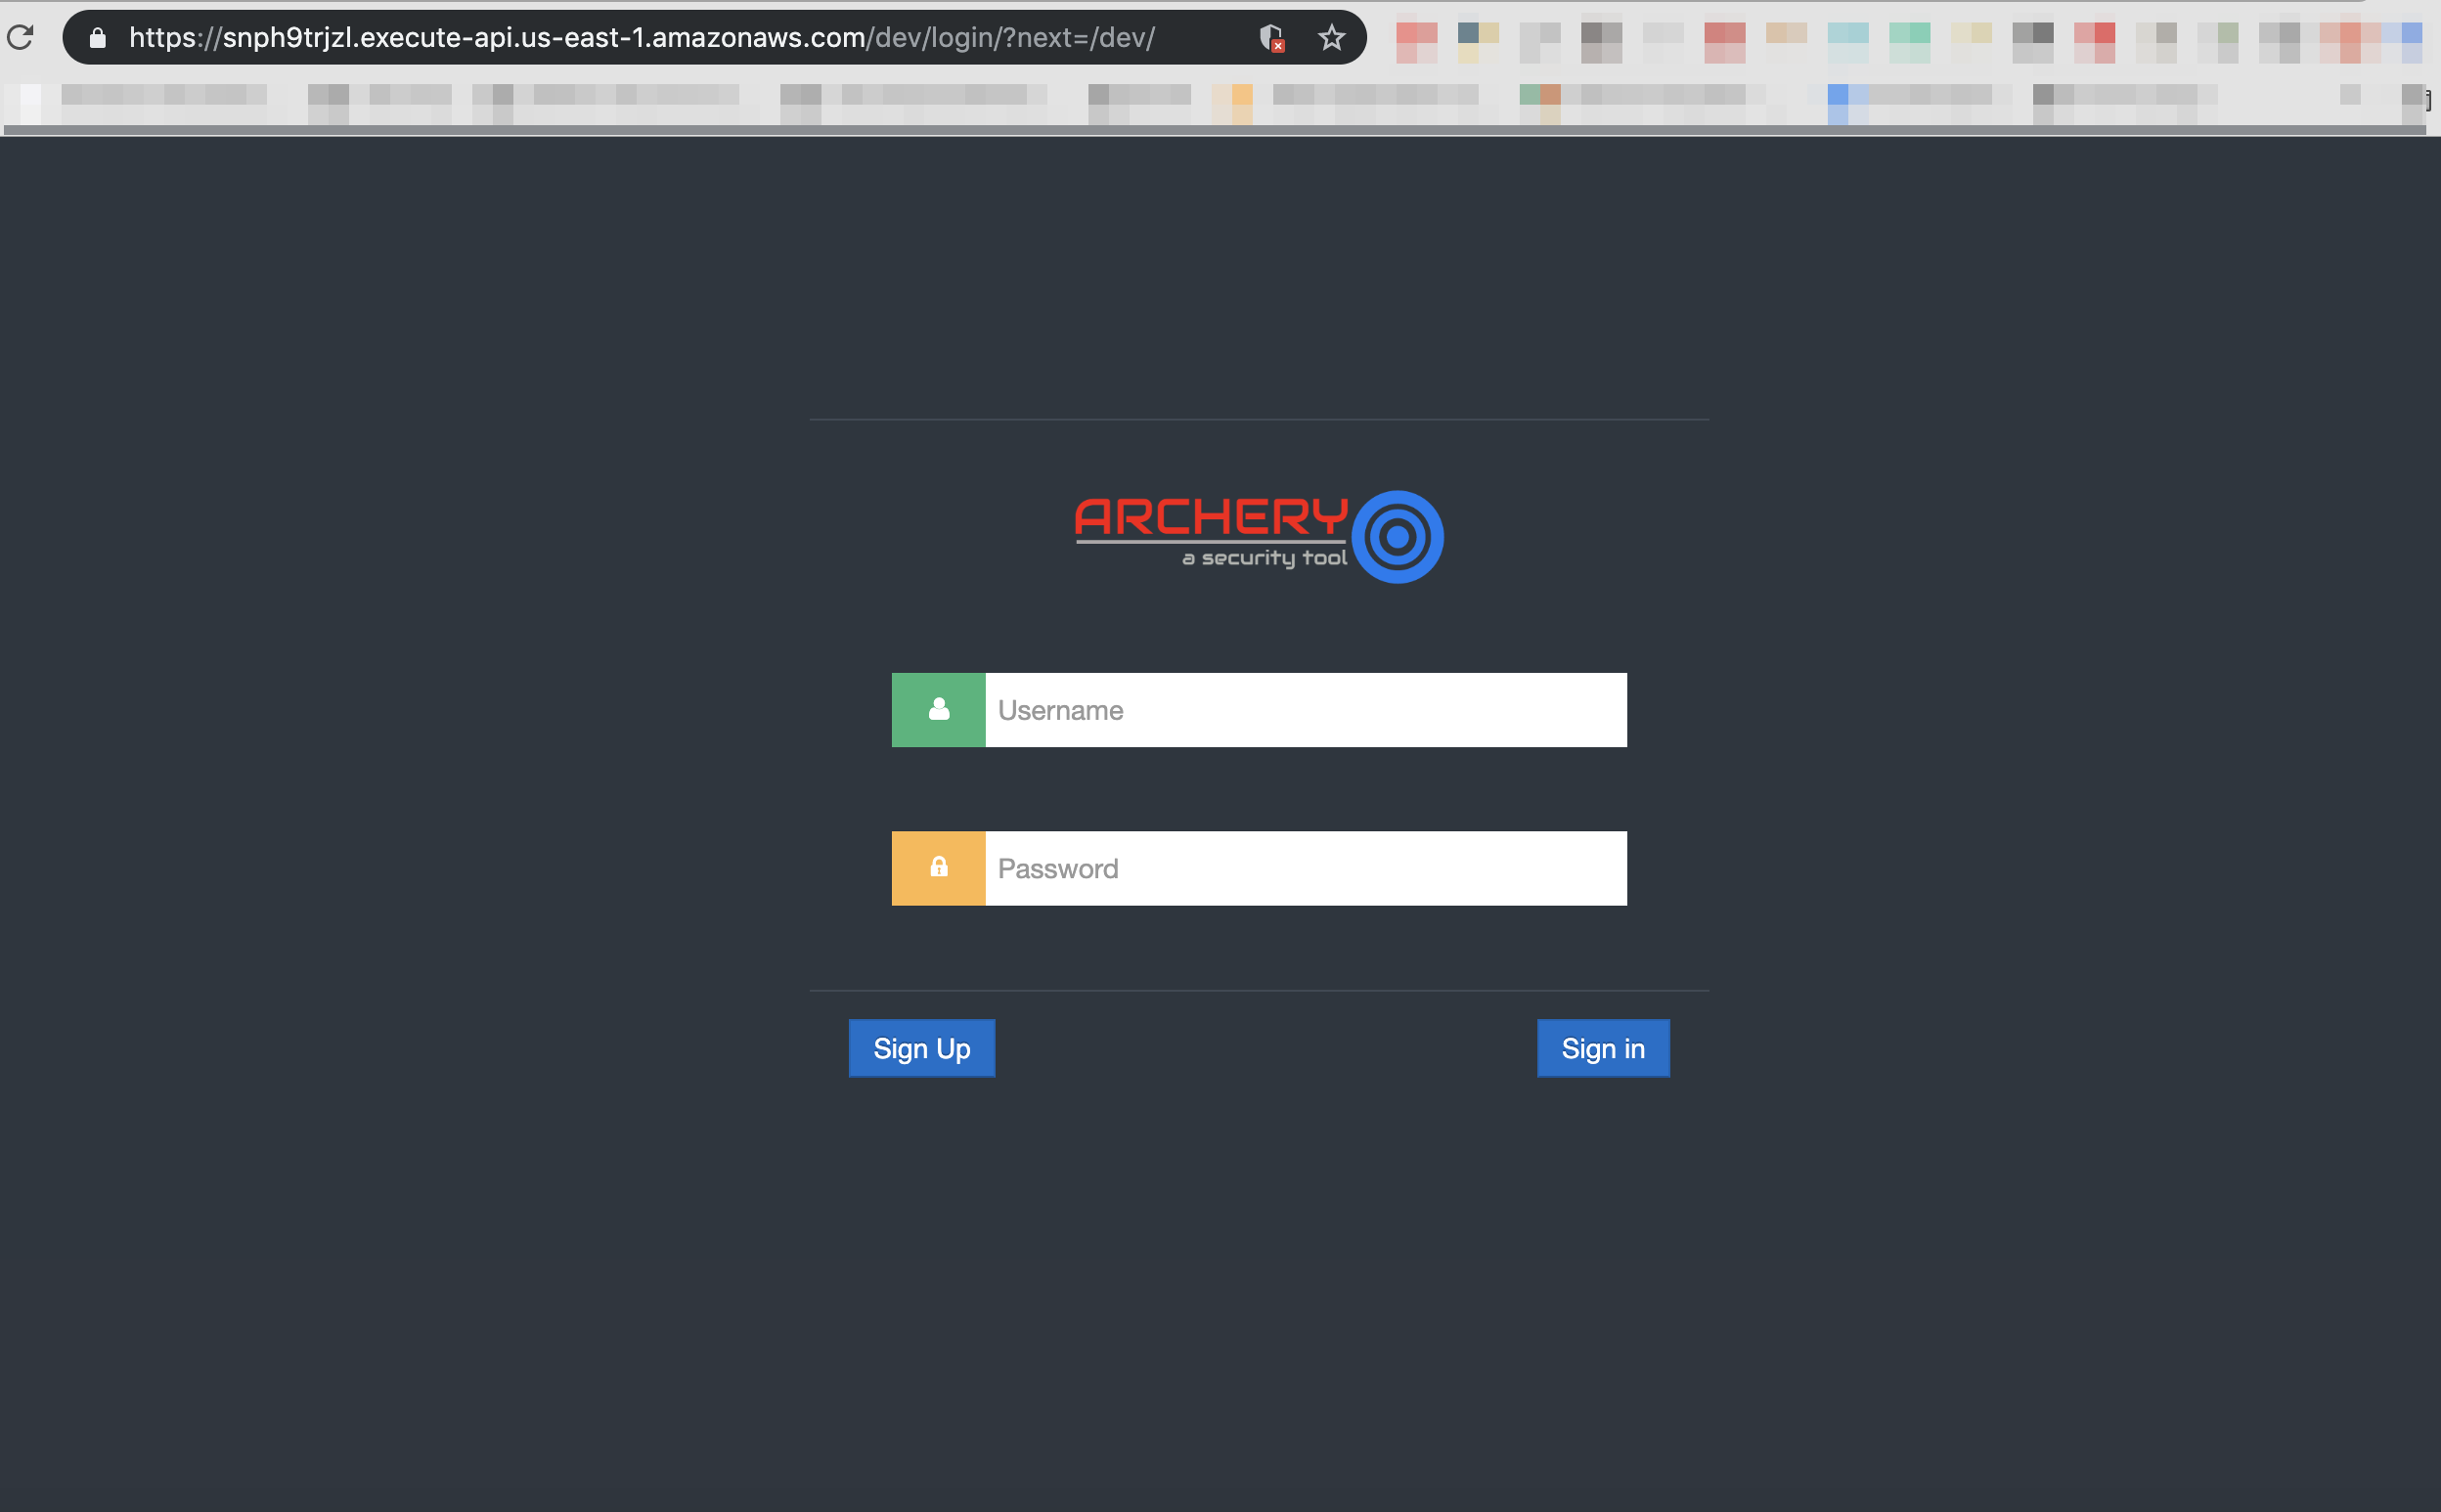
Awsome!! we have successfully deployed ArcherySec tool on AWS Lambda function.
Application can be accessible on API Gateway URL: https://yoururl.execute-api.us-east-1.amazonaws.com/dev/login/?next=/dev/
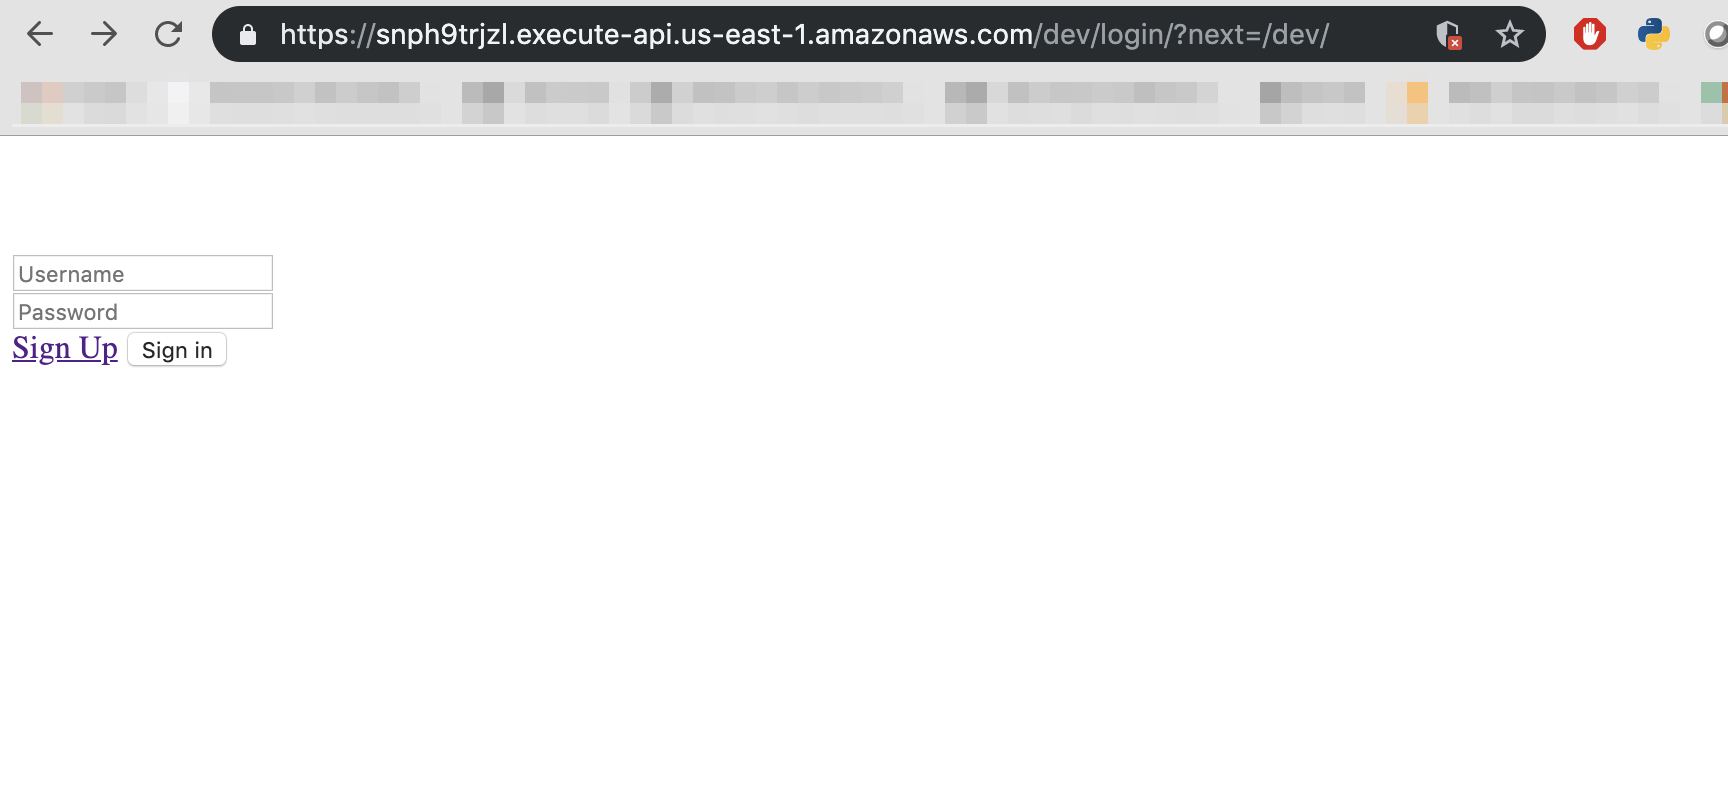
Noticed that the application is not loading static files. We need to use AWS S3 bucket to upload static files and load statics file using django django-s3-storage.
Static file on AWS S3 Bucket
Before setting up django we need to configure S3 bucket.
To serve the static file we need to enable CORS for the S3 bucket, which enables browsers to get resources from different urls.
- Go to S3 bucket and then Permissions.
- Click on CORS Configuration.
- Paste the below lines.
<CORSConfiguration>
        <CORSRule>
            <AllowedOrigin>*</AllowedOrigin>
            <AllowedMethod>GET</AllowedMethod>
            <MaxAgeSeconds>3000</MaxAgeSeconds>
            <AllowedHeader>Authorization</AllowedHeader>
        </CORSRule>
</CORSConfiguration>
Configure ArcherySec for S3
- Install django-s3-storage
$ pip install django-s3-storage
- and also add it in the
requirements.txt file.
- Now update the settings.py file to add django_s3_storage to
INSTALLED_APPS
INSTALLED_APPS = (
          ...,
          'django_s3_storage',
     )
- and also add these lines at the bottom
S3_BUCKET = "itestzappa-test"

STATICFILES_STORAGE = "django_s3_storage.storage.StaticS3Storage"

AWS_S3_BUCKET_NAME_STATIC = S3_BUCKET

STATIC_URL = "https://%s.s3.amazonaws.com/" % S3_BUCKET
- Now load the static files using below command
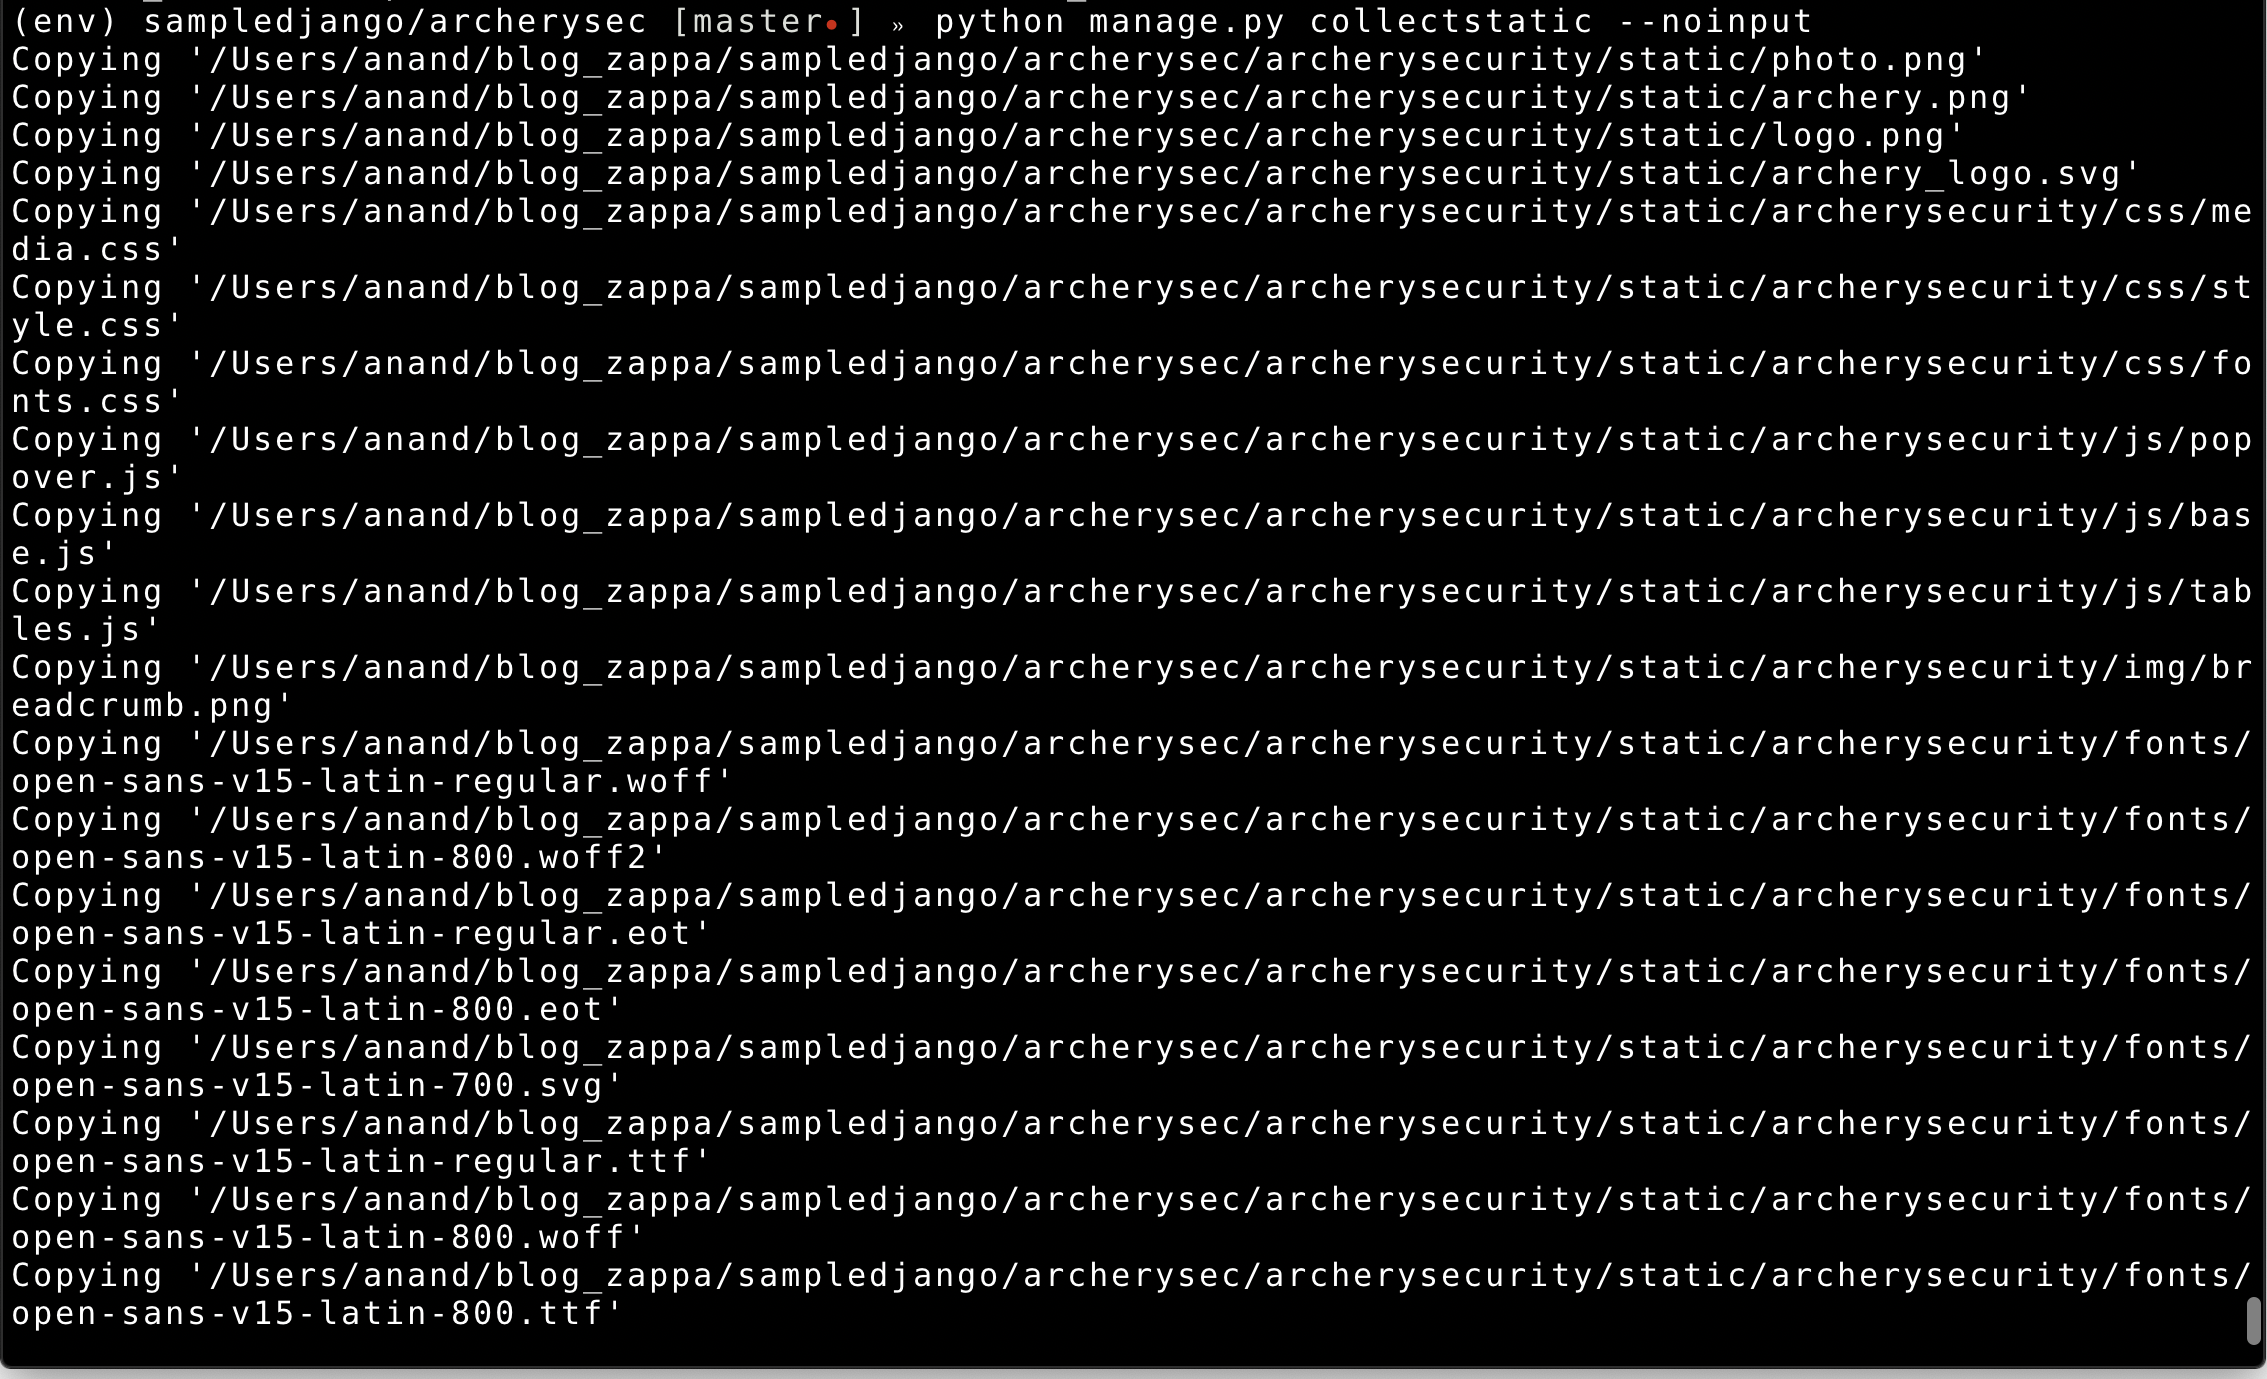
$ python manage.py collectstatic --noinput
It’s take a while to upload static files on AWS s3 bucket.
Once the static files are uploaded on s3 bucket you can update using Zappa command. zappa update dev
and after updating zappa, let us check by refreshing the page.
Database Connection
Django supports both MySQL and PostgreSQL. Hence you can integrated ArcherySec database either of any one databases.
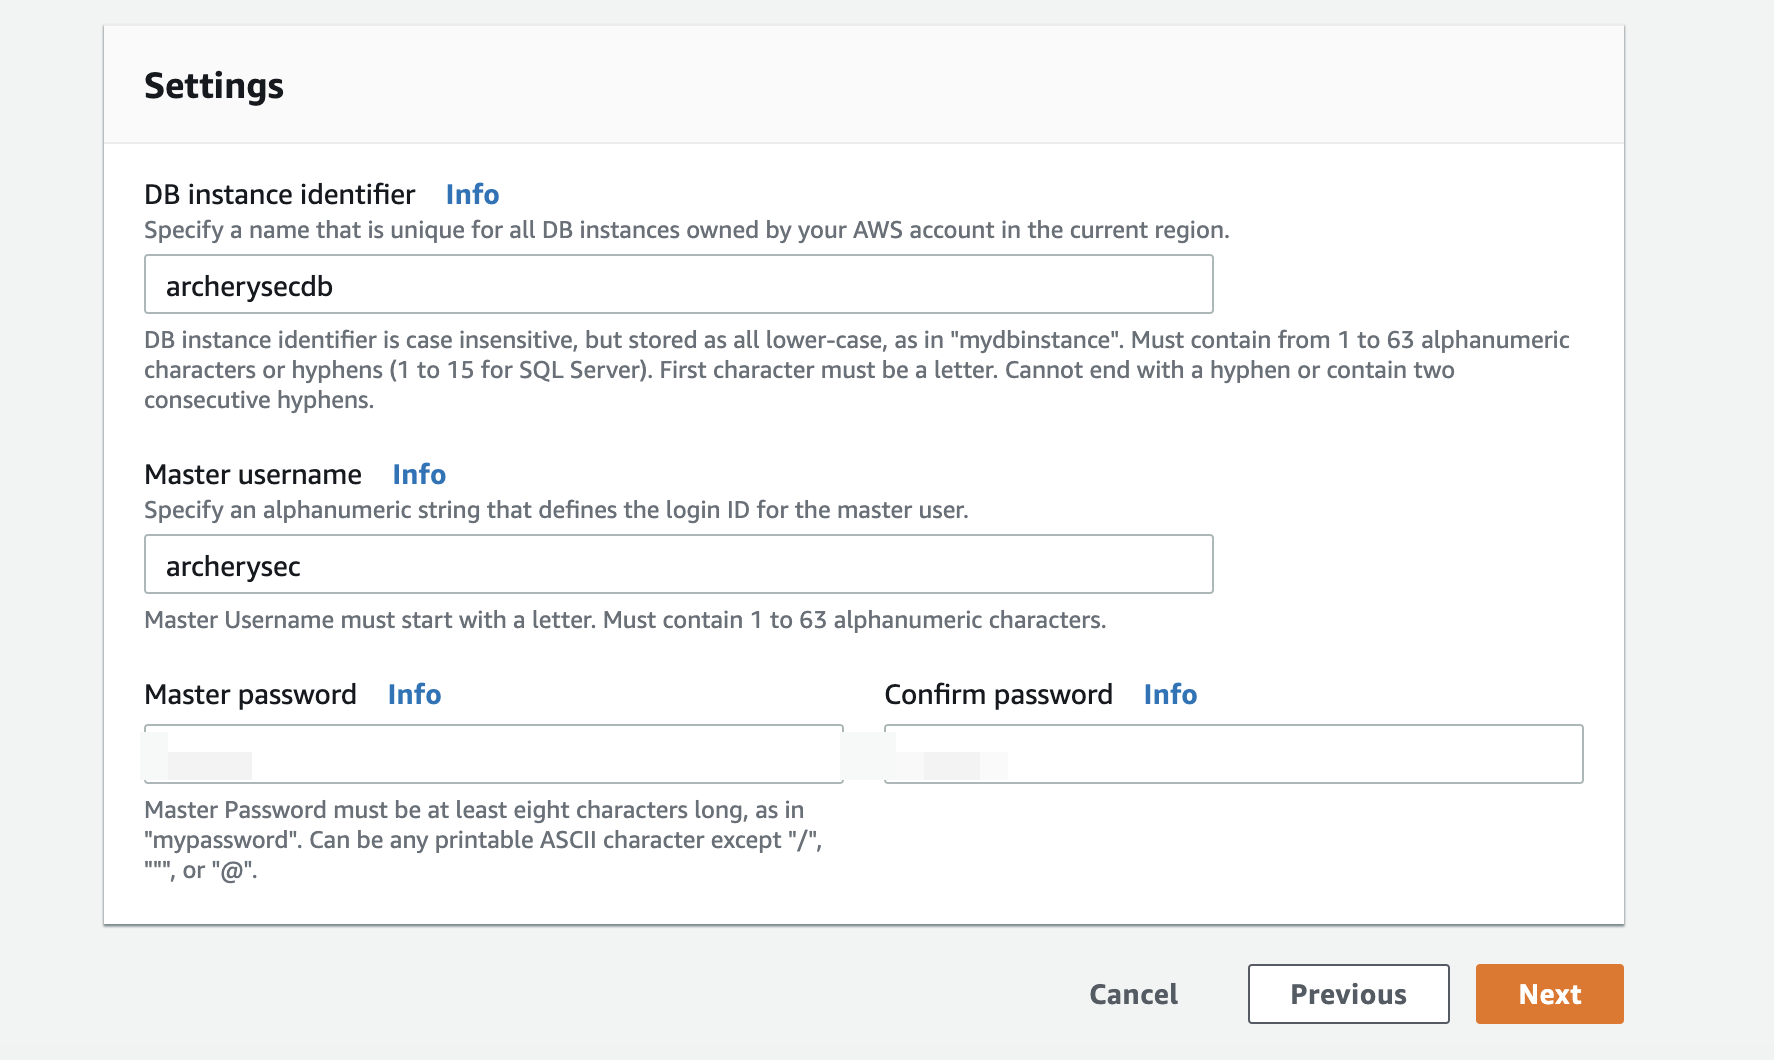
Setup PostgreSQL on AWS RDS
- Go to AWS RDS
- Create new database
- Select PostgreSQL

- Check on “Only enable options eligible for RDS Free Usage Tier”
- Provide “DB instance identifier”, “Master username”, “Master password”
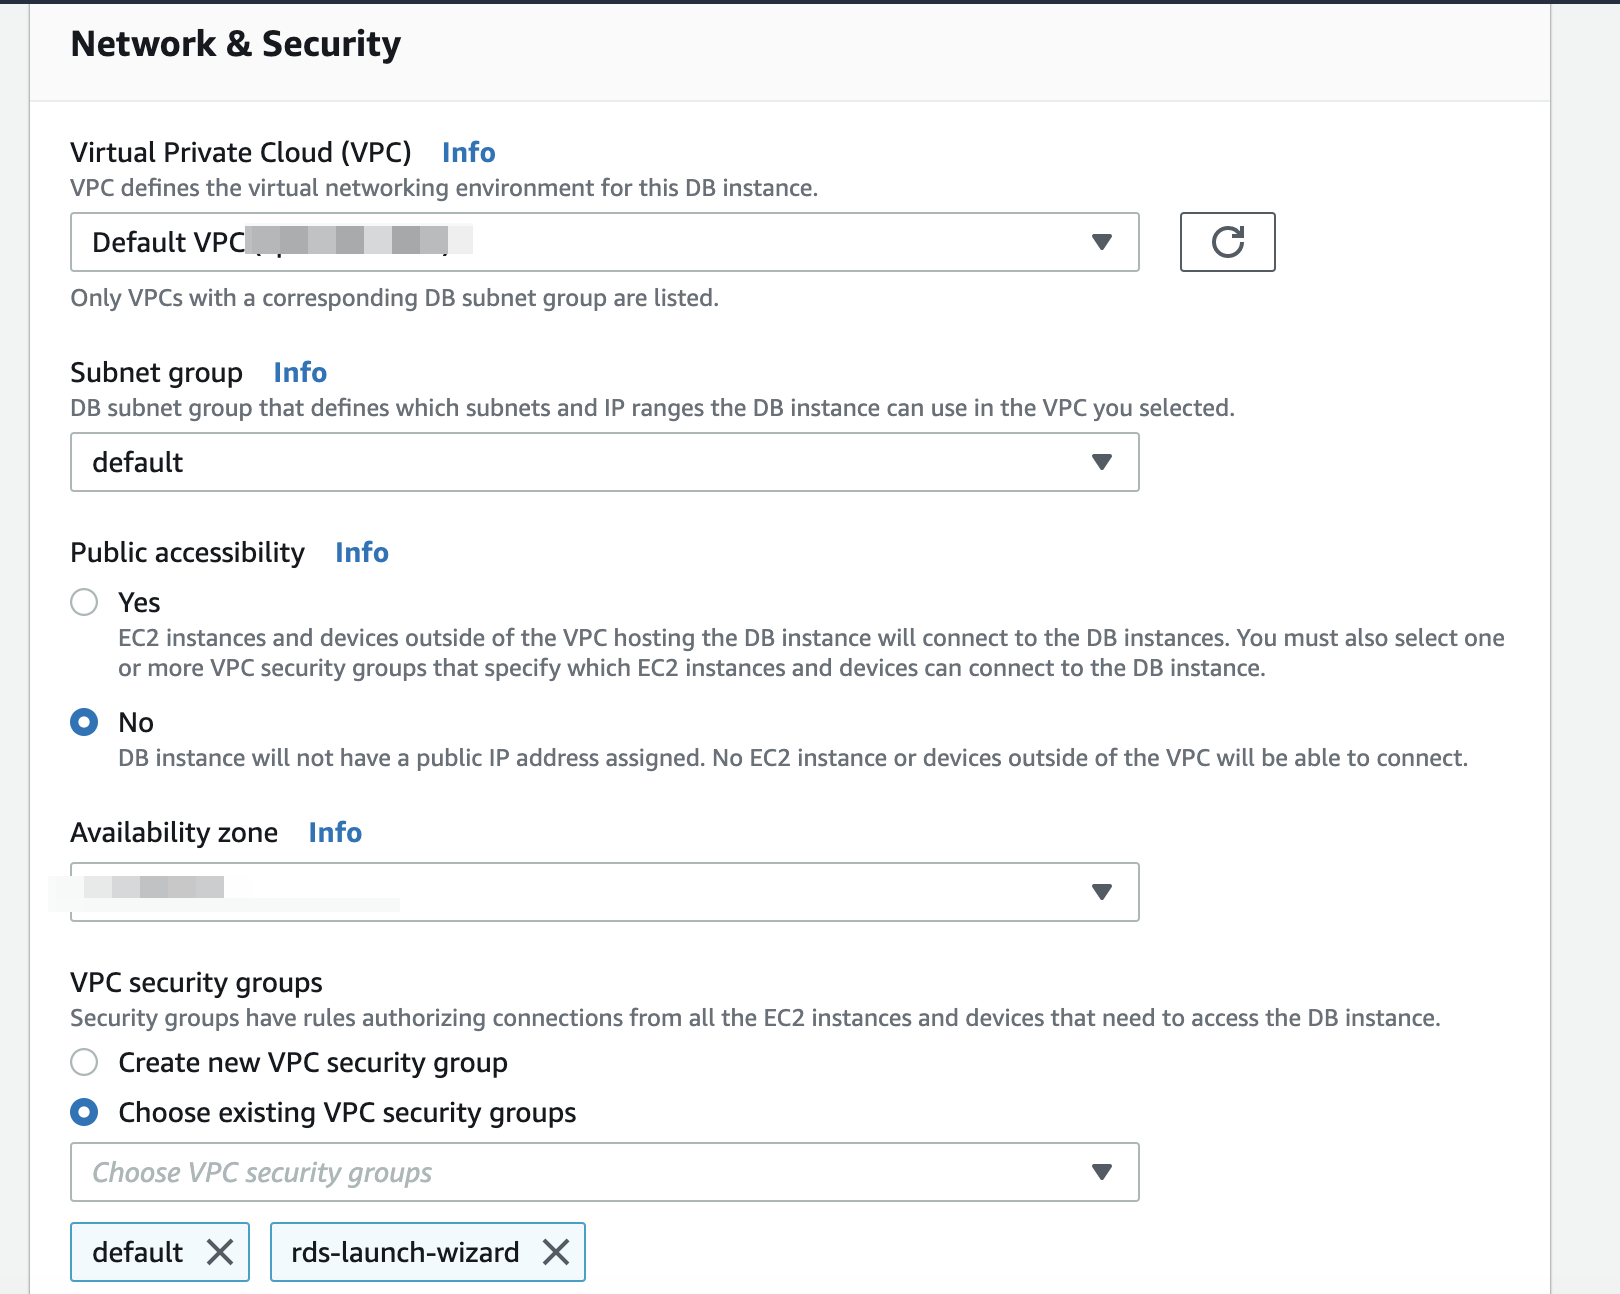
- Setup “Network & Security” which should be same of ArcherySec Lambda function
- Add database details in ArcherySec settings file once database has been created.
- Edit file
archerysecurity/settings/base.py
DATABASES = {
    'default': {
        'ENGINE': 'django.db.backends.postgresql_psycopg2',
        'NAME': 'archerysecdbname',
        'USER': 'administrator',
        'PASSWORD': 'this_is_not_a_good_password',
        'HOST': 'archerysec-db.cr3erer3sjdlk.us-east-1.rds.amazonaws.com',
        'PORT': '5432',
    }

}
Zappa Settings
Now we add the VPC configuration to our Zappa settings file so that the lambda functions can connect to the database.
{
    "dev": {
        "django_settings": "archerysecurity.settings.base",
        "s3_bucket": "archerysectest-code",
        "aws_region": "us-east-1",
        "vpc_config" : {
           "SubnetIds": [ "subnet-f3446aba","subnet-c5b8c79e" ], // use the private subnet
           "SecurityGroupIds": [ "sg-9a9a1dfc" ]

       }

   }
}
Migrate database
Create your migrations and push the updated code. `
zappa update dev
`
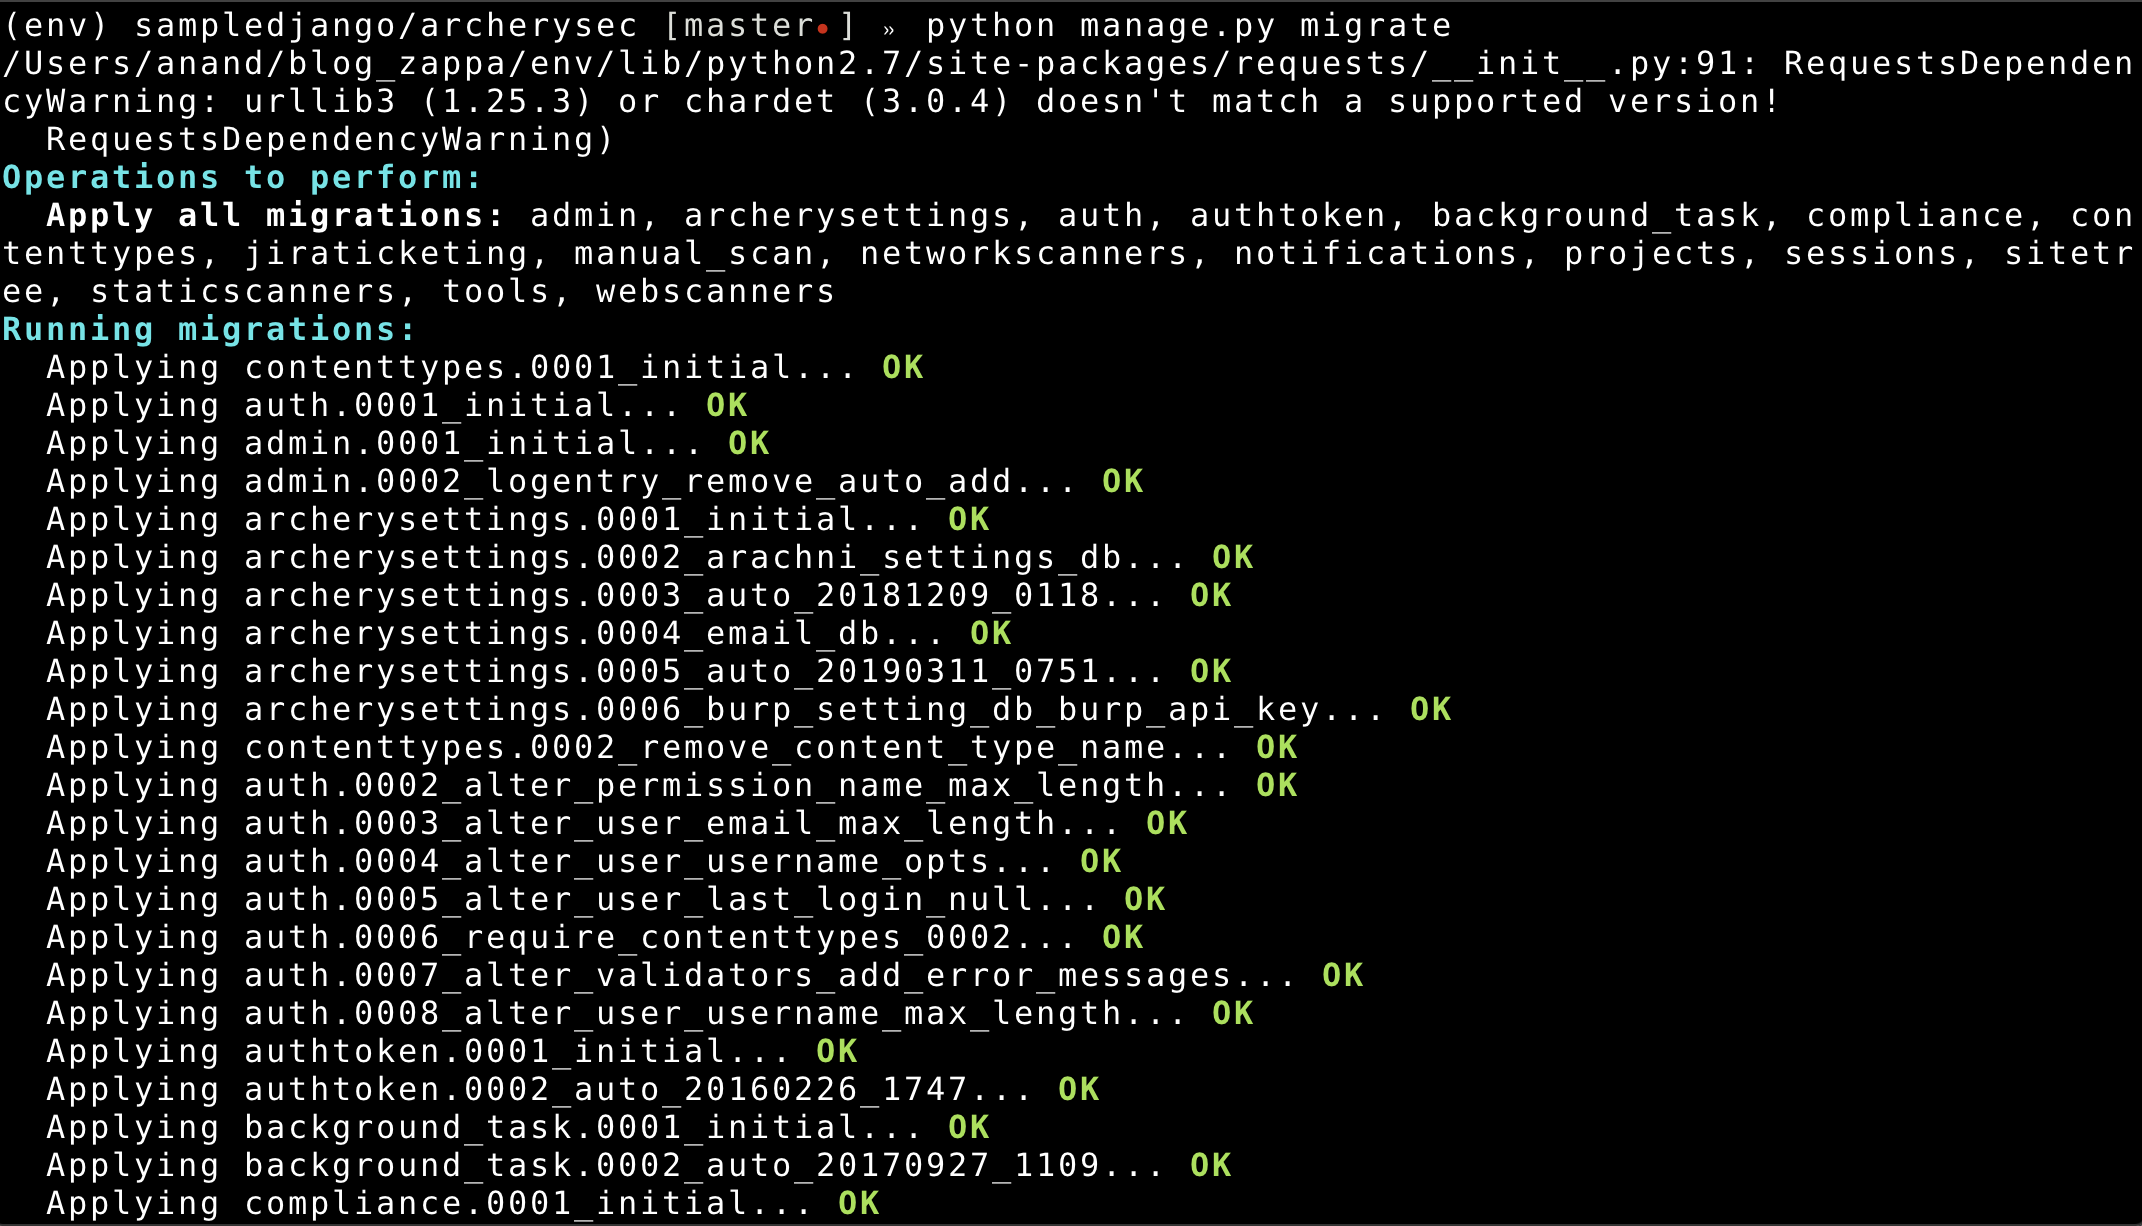
Invoke the zappa manage command: zappa manage dev migrate
- after updating zappa, let us check by refreshing the page.
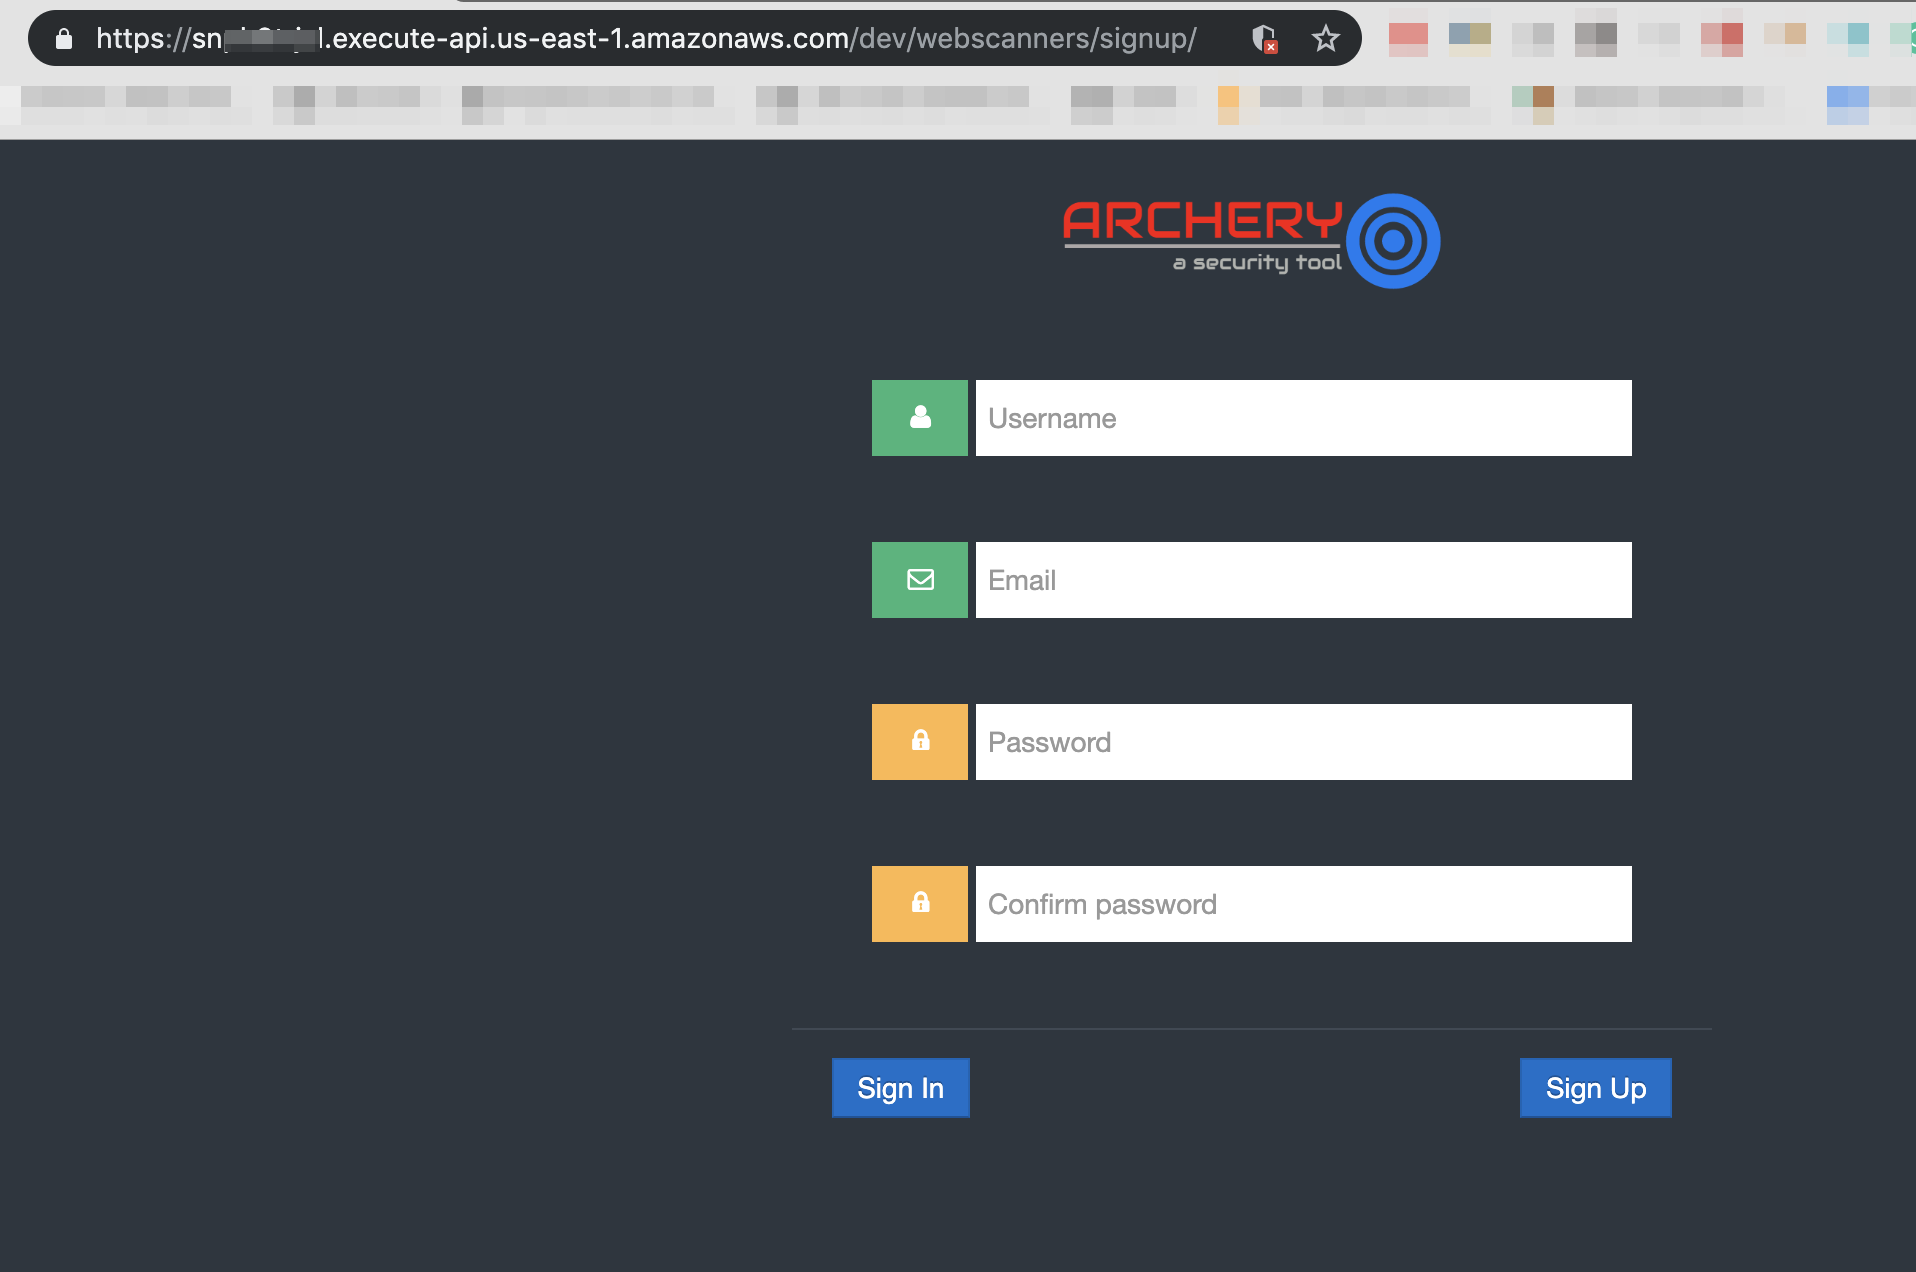
- Create new user using Signup form
https://your_apigateway_end.execute-api.us-east-1.amazonaws.com/dev/webscanners/signup/
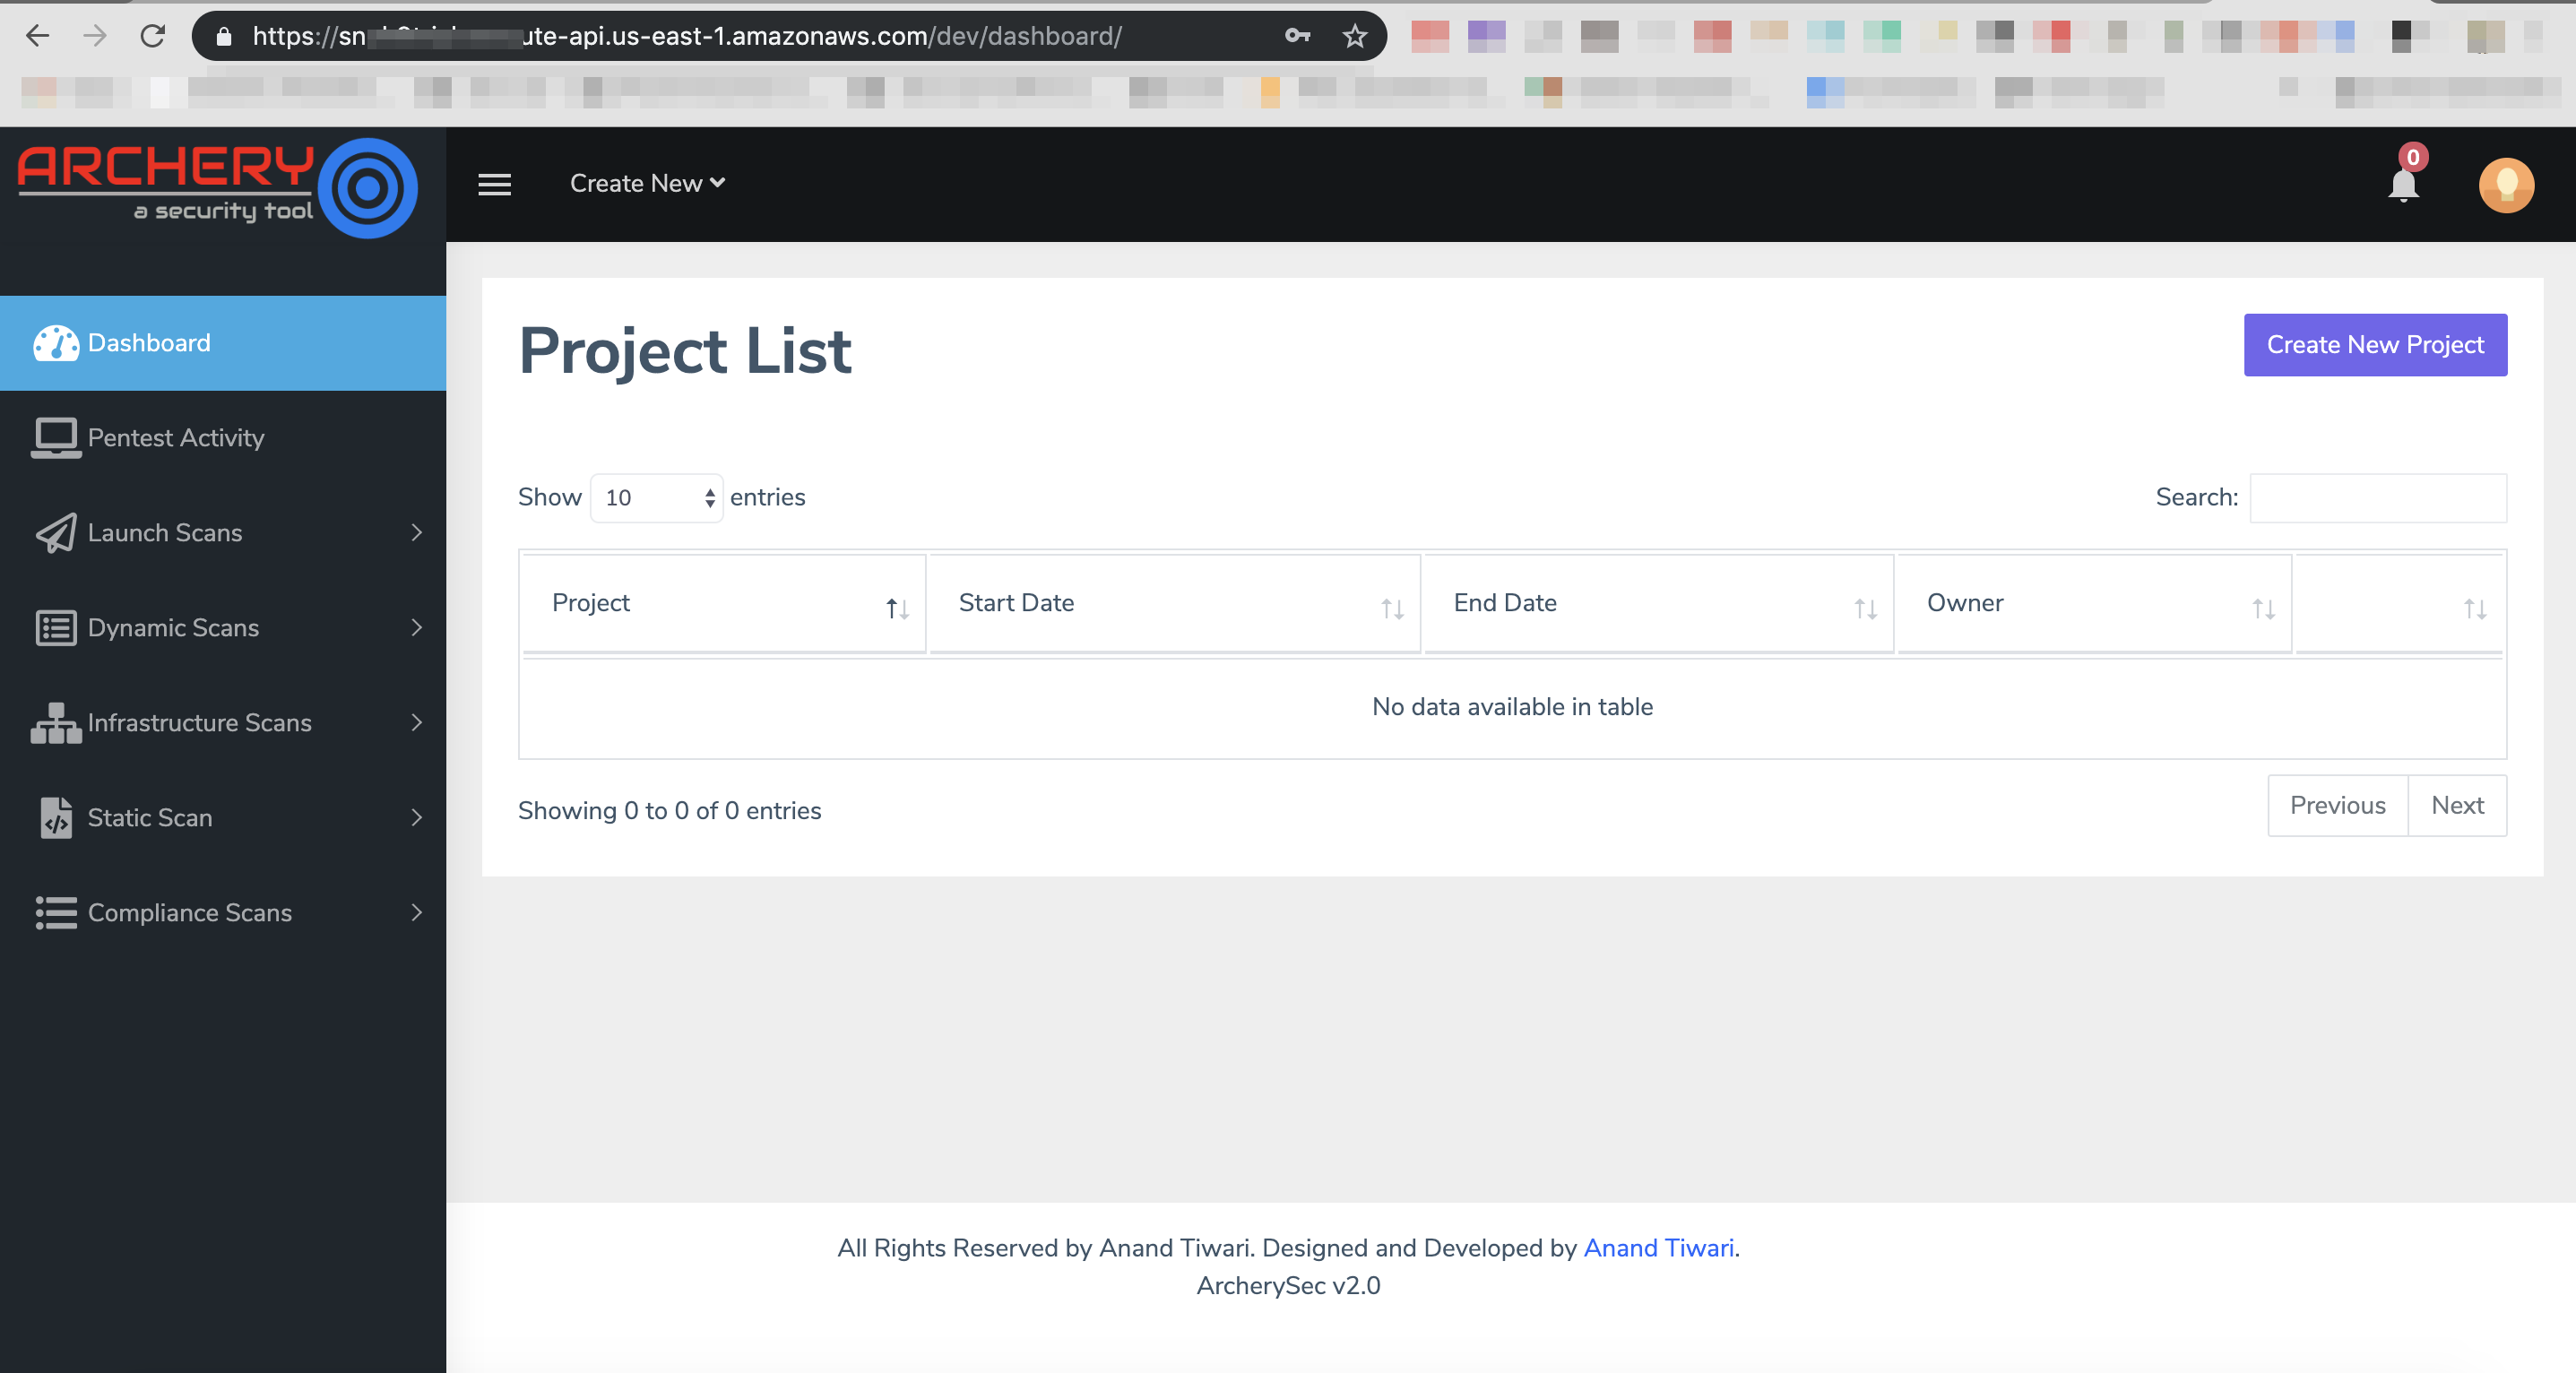
- Login into account.
Restrict ArcherySec signup page from publicly.
Currently ArcherySec signup page accessible publicly and we need to restrict signup page from publicly.
- Edit file
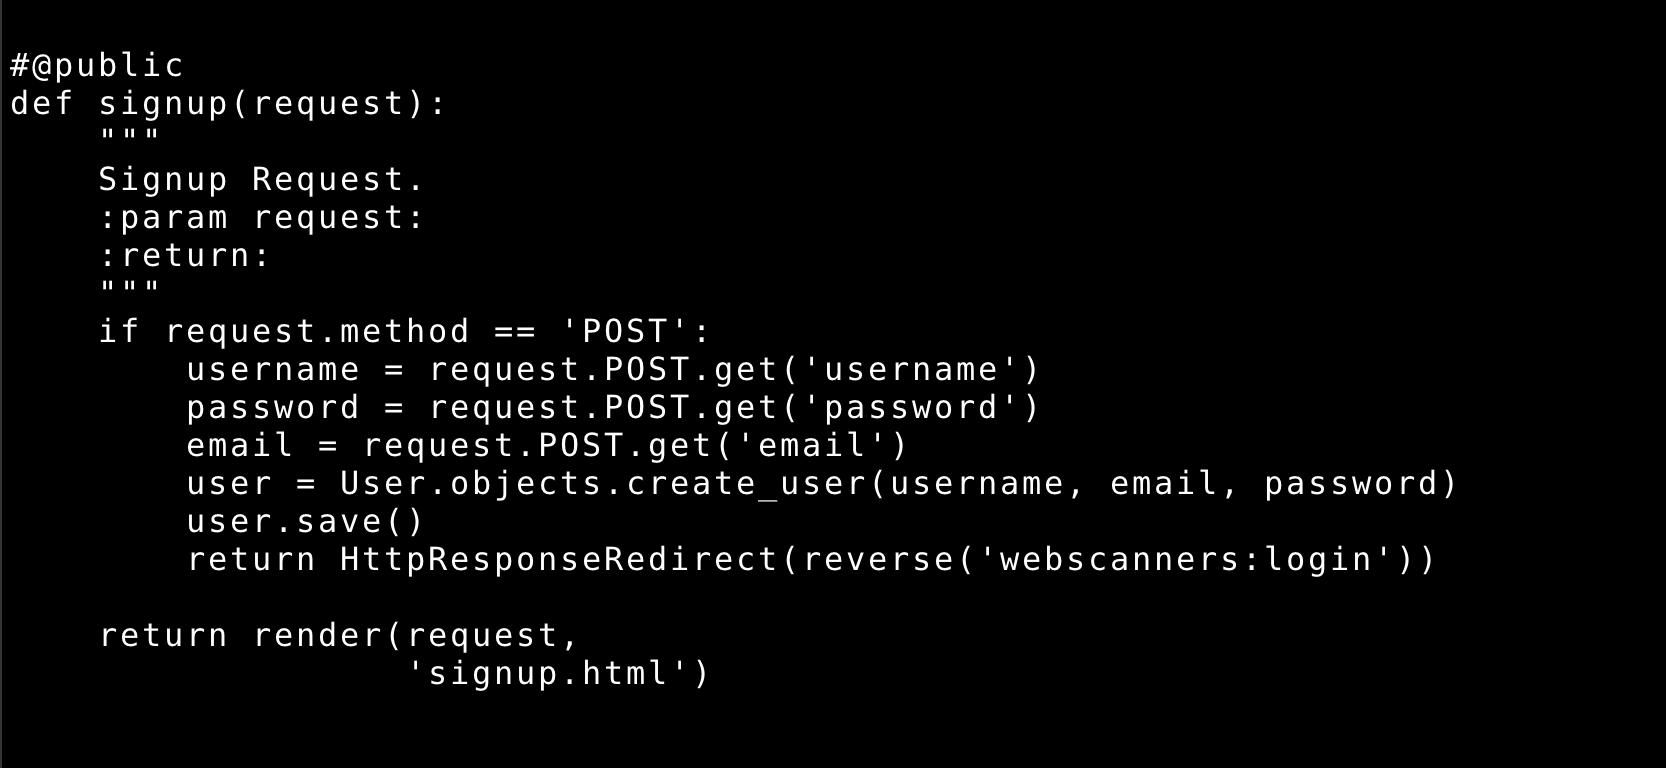
webscanners/web_views.py
- Search def signup function and comment
@public decorator
- Edit file
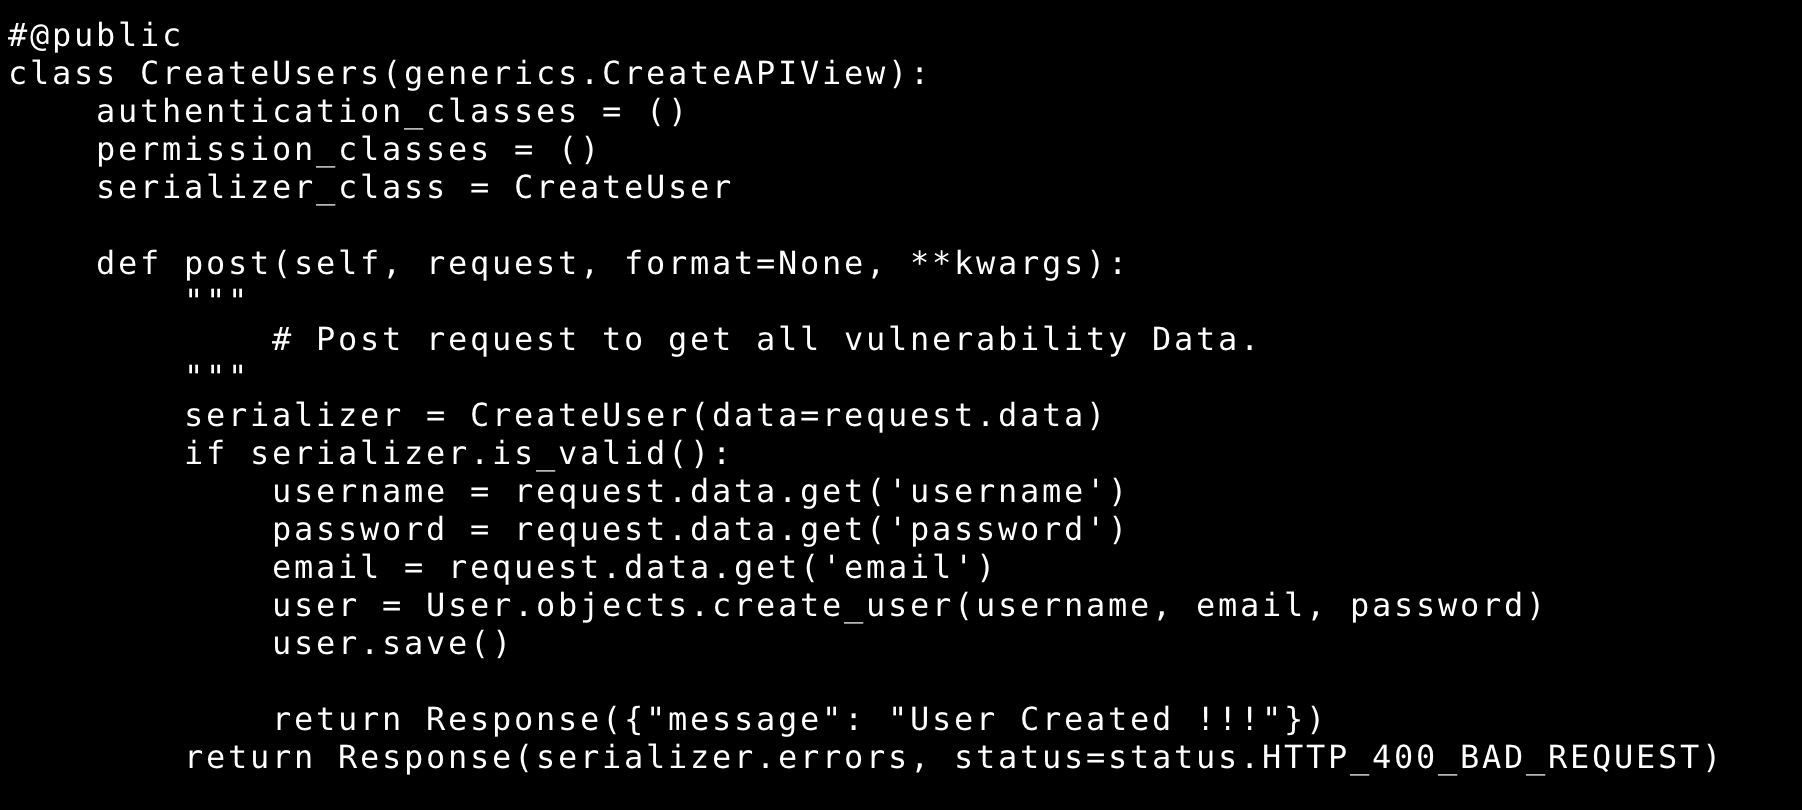
archeryapi/views.py
- Search def class CreateUsers and comment
@public decorator
- Edit file
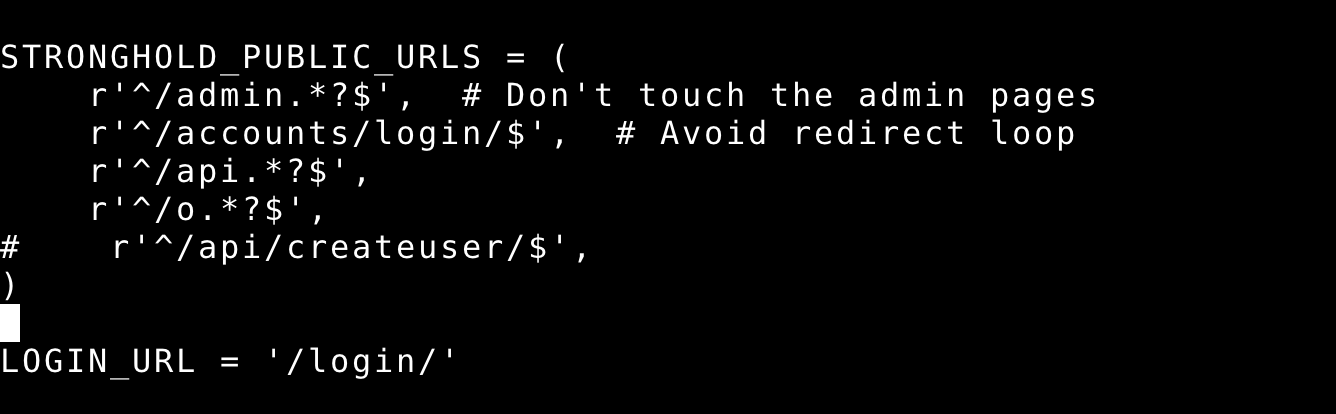
archerysecurity/settings/base.py
- Search
STRONGHOLD_PUBLIC_URLS
- Comment
r'^/api/createuser/$',
- Update code by running command
zappa update dev
Congratulations!! Now ArcherySec has been deployed as serverless, you can check lambda logs using zappa tail
References
ArcherySec is handy tool to feed vulnerability data from DevSecOps pipeline. Vulnerability management is a key part of your DevSecOps process. In our last blog post, we saw how to integrate ArcherySec in our CI/CD pipeline. In this blog post we’ll see how ArcherySec can be deployed as a serverless.
We often heard about “serverless” in computer world. Serverless is a cloud computing performance model where the cloud provider dynamically controls the allocation and provisioning of servers. A serverless application works in stateless compute containers that are event-prompted, temporary, and completely handled by the cloud provider. The pricing in the serverless is based on the count of executions rather than pre-purchased compute capacity.
Think how if your vulnerability management application is serverless and event-driven. We need ArcherySec API when we are feeding data from our DevSecOps pipeline or when we are analyzing vulnerabilities. Hosting ArcherySec application on an EC2 Instance or in containers like ECS make us pay for the idle time too.
In this article we will guide you to deploy a ArcherySec application as server-less using Zappa. Before start deploying ArcherySec application lets understand how Zappa works.
Zappa
Zappa is an open source project that helps you in building and deploying server-less, event-driven Python applications. It helps in deploying and building any WSGI compatible applications that are developed in python. It uses AWS Lambda and AWS API Gateway, and Amazon S3.
When we talk about application hosted on server-less, basically it’s not really serverless, there still is a webserver in a cloud that serving your web responses. The difference is the server life spent is measured in milliseconds. The entire life cycle of a server is within a single HTTP request.
In a traditional client server communication the client makes a request to the web server, calls the application HTML, CSS, etc and code sends back a response to the browser. The server should be up and running 24/7 just waiting for requests and responses.
With AWS Lambda + AWS API Gateway when the HTTP request comes in through the AWS API Gateway, then it creates the instance of the AWS Lambda function which process the request returns through the AWS API Gateway and then the server is wiped out. So you have used a server in a matter of milliseconds and a major advantage of this approach is that you don’t have to worry about keeping your server up and running 24/7 and you only pay aws instance for a millisecond.
AWS Lambda
AWS Lambda lets you run code without provisioning or managing servers. You pay only for the compute time you consume, there is no charge when your code is not running.
So AWS Lambda function is perfect solution for us. It scales automatically and we pay only when we consume it. If our code is not running then it’s not chargeable. Also its running with zero administration.
Configure AWS Credentials
Before start using AWS, we have to make sure we have a valid AWS account and have the AWS access-key which we are going to use in our environment.
Get the access key from IAM
- Go to IAM console and navigate to users.
- Go to Security Credentials
- Create access key and note down the value of “Access key ID” & “Secret access key”.
- Create a folder called aws at the root level.
mkdir .aws
###~/.aws/credentials
[default]
aws_access_key_id = XXXXXXXXXXXXXXXXXXXXXXXXXXXX
aws_secret_access_key = XXXXXXXXXXXXXXXXXXXXXXXXXXXX
Permissions
Make sure you have provided correct permissions to the user. We need following permission to run Zappa.
- AWSLambda
- AmazonS3
- AmazonAPIGateway
- AWSDeepRacerCloudFormationAccessPolicy
- AmazonEC2
Roles
We need to create role and provide the appropriate permissions. Zapp configuration file will use and deploy applications on Lambda and API gateway.
- Go to Roles and create new role.
- Attached the following policies
- AWSLambda
- AmazonAPIGatewayPushToCloudWatchLogs
- AWSLambdaVPCAccessExecutionRole
- Move to Trust Relationship and Edit Trust Relationship.
- Copy and paste the below code.
{
"Version": "2012-10-17",
"Statement": [
{
"Sid": "",
"Effect": "Allow",
"Principal": {
"Service": [
"events.amazonaws.com",
"lambda.amazonaws.com",
"apigateway.amazonaws.com"
]
},
"Action": "sts:AssumeRole"
}
]
}
We need to trust the amazonaws events, lambda and apigateway end points.
- Note down Role Name and Role ARN as we need in Zappa configuration file.
Deploy ArcherySec Application Using Zappa
Clone ArcherySec project folder in our local system.
$ git clone https://github.com/archerysec/archerysec.git
$ cd archerysec
Install ArcherySec required library
$ pip install -r requirements-zappa.txt
After installing Zappa, let’s configure Zappa
$ zappa init
which will ask us for the following:
- Name of environment - default ‘dev’
- S3 bucket for deployments. If the bucket does not exist, zappa will create it for us. Zappa uses this bucket to hold the zappa package temporarily while it is being transferred to AWS lambda, which is then deleted after deployment.
- Project’s settings provide as
archerysecurity.settings.base
Some additional parameter required by Zappa configuration file.
- Edit the zappa_settings.json file
- Provide the aws_region: us-east-1
- Manage_roles: false
- role_name:
- role_arn:
Zappa configuration file
{
"dev": {
"aws_region": "us-east-1",
"django_settings": "archerysecurity.settings.base",
"profile_name": "default",
"project_name": "archerysec-aws",
"runtime": "python2.7",
"s3_bucket": "zappa-test",
"manage_roles": false,
"role_name": "archerysectest",
"role_arn": "arn:aws:iam::868167788748:role/archerysectest",
}
}
Now let us deploy the app
$ zappa deploy dev
Now you need to add your AWS API Gateway host as allowed host in application settings file and disable debugging by marking it as False.
- Edit settings file:
archerysecurity/settings/base.py - DEBUG = False
- Replace * with your host in Allowed host
ALLOWED_HOSTS = ['your_api_gateway_host']
- Add below lines in setting file
archerysecurity/settings/base.py
FORCE_SCRIPT_NAME = "/dev/"
LOGIN_URL = FORCE_SCRIPT_NAME + 'login/'
- Update code by running command
zappa update dev
Awsome!! we have successfully deployed ArcherySec tool on AWS Lambda function.
Application can be accessible on API Gateway URL: https://yoururl.execute-api.us-east-1.amazonaws.com/dev/login/?next=/dev/
Noticed that the application is not loading static files. We need to use AWS S3 bucket to upload static files and load statics file using django django-s3-storage.
Static file on AWS S3 Bucket
Before setting up django we need to configure S3 bucket.
To serve the static file we need to enable CORS for the S3 bucket, which enables browsers to get resources from different urls.
- Go to S3 bucket and then Permissions.
- Click on CORS Configuration.
- Paste the below lines.
<CORSConfiguration>
<CORSRule>
<AllowedOrigin>*</AllowedOrigin>
<AllowedMethod>GET</AllowedMethod>
<MaxAgeSeconds>3000</MaxAgeSeconds>
<AllowedHeader>Authorization</AllowedHeader>
</CORSRule>
</CORSConfiguration>
Configure ArcherySec for S3
- Install django-s3-storage
$ pip install django-s3-storage
- and also add it in the
requirements.txtfile. - Now update the settings.py file to add django_s3_storage to
INSTALLED_APPS
INSTALLED_APPS = (
...,
'django_s3_storage',
)
- and also add these lines at the bottom
S3_BUCKET = "itestzappa-test"
STATICFILES_STORAGE = "django_s3_storage.storage.StaticS3Storage"
AWS_S3_BUCKET_NAME_STATIC = S3_BUCKET
STATIC_URL = "https://%s.s3.amazonaws.com/" % S3_BUCKET
- Now load the static files using below command
$ python manage.py collectstatic --noinput
It’s take a while to upload static files on AWS s3 bucket.
Once the static files are uploaded on s3 bucket you can update using Zappa command. zappa update dev
and after updating zappa, let us check by refreshing the page.
Database Connection
Django supports both MySQL and PostgreSQL. Hence you can integrated ArcherySec database either of any one databases.
Setup PostgreSQL on AWS RDS
- Go to AWS RDS
- Create new database
- Select PostgreSQL
- Check on “Only enable options eligible for RDS Free Usage Tier”
- Provide “DB instance identifier”, “Master username”, “Master password”
- Setup “Network & Security” which should be same of ArcherySec Lambda function
- Add database details in ArcherySec settings file once database has been created.
- Edit file
archerysecurity/settings/base.py
DATABASES = {
'default': {
'ENGINE': 'django.db.backends.postgresql_psycopg2',
'NAME': 'archerysecdbname',
'USER': 'administrator',
'PASSWORD': 'this_is_not_a_good_password',
'HOST': 'archerysec-db.cr3erer3sjdlk.us-east-1.rds.amazonaws.com',
'PORT': '5432',
}
}
Zappa Settings
Now we add the VPC configuration to our Zappa settings file so that the lambda functions can connect to the database.
{
"dev": {
"django_settings": "archerysecurity.settings.base",
"s3_bucket": "archerysectest-code",
"aws_region": "us-east-1",
"vpc_config" : {
"SubnetIds": [ "subnet-f3446aba","subnet-c5b8c79e" ], // use the private subnet
"SecurityGroupIds": [ "sg-9a9a1dfc" ]
}
}
}
Migrate database
Create your migrations and push the updated code. ` zappa update dev `
Invoke the zappa manage command: zappa manage dev migrate
- after updating zappa, let us check by refreshing the page.
- Create new user using Signup form
https://your_apigateway_end.execute-api.us-east-1.amazonaws.com/dev/webscanners/signup/
- Login into account.
Restrict ArcherySec signup page from publicly.
Currently ArcherySec signup page accessible publicly and we need to restrict signup page from publicly.
- Edit file
webscanners/web_views.py - Search def signup function and comment
@publicdecorator
- Edit file
archeryapi/views.py - Search def class CreateUsers and comment
@publicdecorator
- Edit file
archerysecurity/settings/base.py - Search
STRONGHOLD_PUBLIC_URLS - Comment
r'^/api/createuser/$',
- Update code by running command
zappa update dev
Congratulations!! Now ArcherySec has been deployed as serverless, you can check lambda logs using zappa tail
References